

Thread.sleep() Method in Java — Complete Tutorial With Example
Steve (a fresher) recently joined our team as a Test Engineer. He was passionate and eager to learn new techniques and technologies and gain expertise in software testing. We were working on an application that eased the customers’ pain of making offline medical payments by standing in queues to bring it all at their fingertips and make the payments online.
It was a web application that helped customers to make payments easily using their Debit and Credit Cards. It had an intuitive interface that could be easily learned to use.
As it was a web application, our team agreed to use Selenium WebDriver with Java, as most of the application was written using Java. Steve was given one task of automating the payment page. It had some fields related to the Credit/Debit Card numbers, CVV, and some fields to accept user details like First Name, Last Name, Address, etc.
It was an easy task; however, since Steve was new to the test automation field, he could automate most of the stuff. However, he struggled with one automation test case where he had to click on the Continue button of a pop-up message after entering the card details for making a payment. As he could not find a solution, he approached me with the query, and we decided to debug the test further for the failure.
We thought it might be an issue related to the incorrect locator of the Continue button. Locators in Selenium play a significant role in interacting with the web elements. Initially, XPath was used to locate the Continue button, so we changed it to CSS Selector as it is faster and simpler than XPath. However, the test was still unable to click on the Continue button.
To debug the issue, we decided to use Thread.sleep() in the code to pause the code for 3 seconds and place it above the code statement where we were clicking on the Continue button. Voila, the test ran successfully!!
When we investigated the problem further, we found that it took some time for the pop-up to appear on the screen. However, by the time the pop-up appeared, the code had passed the lines where it needed to click on the Continue button. Due to this, the test failed. Many test automation engineers might have faced a similar issue as well. The learnings of this blog on using Thread.sleep() in Java can be useful in resolving such issues.
In this Selenium Java tutorial, we will be talking about Thread.sleep() in Java to pause the code execution for some time and will move towards the best practices of using Selenium’s Implicit, Explicit and Fluent Waits in the code for saving the time in test automation code execution.
Learn the essential concepts, techniques, and strategies for high-quality software through effective Software Quality Assurance. This guide covers its importance, benefits, practical tips, and best practices
What is Thread.sleep()?
Thread class is present in java.lang package and contains the sleep() method in it.
Thread.sleep() stops the execution of a program in the current thread for a certain time as per the duration specified as a parameter.
This is a blocking wait unless any other thread generates an interrupt. So, when it comes to using Thread.sleep() in test automation, it can have huge repercussions if the delay is high.
The sleep() method does not return any value as the method is void. It throws an InterruptedException in case any other thread interrupts the current thread.
The following image explains the life cycle of a thread –
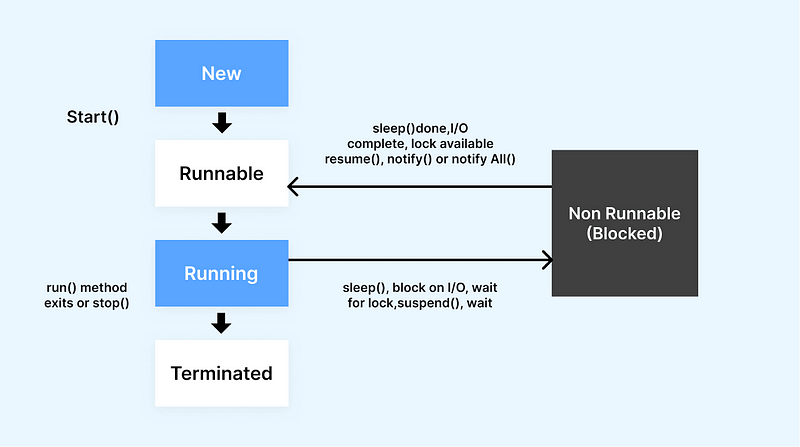
When a thread is created, it is in a New state meaning its code is yet to be run and is not started to execute.
Next, it moves to a Runnable instance, which means the code is in the state to run and can be executed at any time.
Running instance is where the code execution starts, after which the timed wait may be called for blocking or making the program wait for a fixed time duration, and the program will return to a runnable/running state after the duration has passed. For example, the sleep() method is called in Thread to make the thread wait for a timed duration.
Finally, the thread is Terminated either due to the program execution being complete or any error occurred, causing the program to exit abruptly. For example, an unhandled exception occurred.
There are two overloaded sleep() methods in the Thread class as follows:
sleep(long millis)
sleep(long millis, int nanos)
Discover the ins and outs of UX testing with this comprehensive guide. Explore various testing methods, tools, and best practices for measuring success
sleep(long millis)
This method accepts one parameter (i.e., duration of time in milliseconds). It throws an InterruptedException if any other thread interrupts the current thread.
Another exception this method can throw is an IllegalArgumentException when the value of milliseconds supplied in the parameter is negative or not in the range from 0–999999.
Example
The following code shows a simple implementation of how to use Thread.sleep() to pause your automation tests for debugging purposes.
import java.lang.Thread;

@Test
public void testThreadSleep() throws InterruptedException {
WebDriver driver = new ChromeDriver();
driver.get("https://ecommerce-playground.lambdatest.io/");

Thread.sleep(3000);
String title = driver.getTitle();

System.out.println(title);
driver.quit();
}
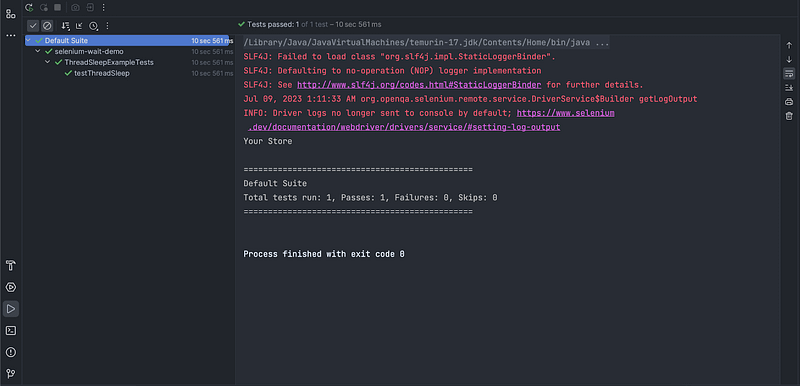
The above snippet will create a new instance of ChromeDriver and navigate to the LambdaTest eCommerce playground. It will halt the test execution using Thread.sleep for 3 seconds(3000 milliseconds = 3 seconds). It will get the web page’s title and print it in the console. Finally, the quit() method of Selenium is called to quit the driver instance gracefully.
Test Execution
On executing the tests, the page title “Your Store” gets printed in the console. The total time taken to execute the tests is 10 seconds 561 ms, which includes the 3000 milliseconds (3 seconds) of Thread.sleep() method.
sleep(long millis, int nanos)
This is an overloaded version of the sleep() method we discussed in the earlier section of this blog on using Thread.sleep() in Java. It accepts two parameters, the first duration of time in milliseconds, and the second is the time in nanoseconds that is provided as additional time for the thread to sleep.
It throws an InterruptedException in case any other thread interrupts the current thread. IllegalArgumentException is thrown when the values in any of the two parameters are provided as negative or are not in the range 0–999999.
Example
The following snippet shows a simple implementation of how to use Thread.sleep() to pause your automation tests for debugging purposes.
import java.lang.Thread;

@Test
public void testThreadSleep() throws InterruptedException {
WebDriver driver = new ChromeDriver();
driver.get("https://ecommerce-playground.lambdatest.io/");

Thread.sleep(3000);
String title = driver.getTitle();

System.out.println(title);
driver.quit();
}
The above snippet creates a new instance of ChromeDriverand navigates to the eCommerce playground. The execution is halted for 3000 milliseconds and 2 nanoseconds.
Next, it will fetch the current URL using Selenium’s getCurrentUrl() method and print the URL’s text in the console. Finally, Selenium’s quit() method will be called to quit the driver gracefully.
Test Execution
Here is the screenshot from IntelliJ that shows the test execution.
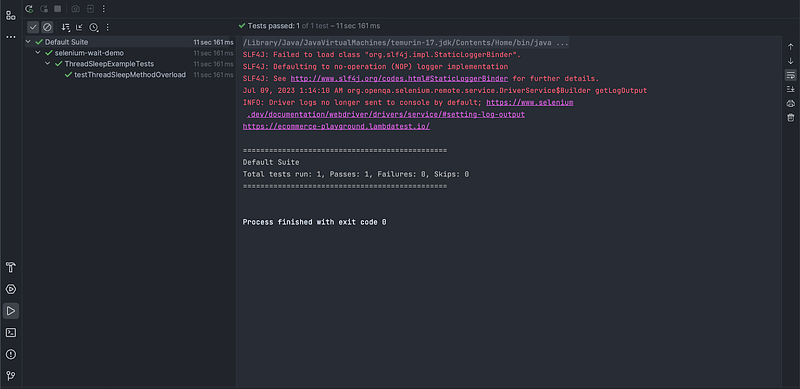
The total time taken to execute tests is 11 seconds 161 ms, including the time duration (3000 milliseconds and 2000 nanoseconds) added in the Thread.sleep() method.
Explore our comprehensive guide on GUI Testing, uncovering its vital role in software development. Learn about its different types, best practices, and steps for effective implementation to enhance your software’s user interaction.
Thread.sleep() example in a multi-threaded program
In the previous examples, we used Thread.sleep() in a single-threaded program, meaning only one thread was Running.
Let’s see how Thread.sleep() can be used in a multi-threaded program.
FileName: ThreadLocalExample.java
public class ThreadLocalExample implements Runnable {

private final ThreadLocal<Integer> threadLocal = new ThreadLocal<Integer>();

@Override
public void run() {
final long startTime = System.currentTimeMillis();
this.threadLocal.set((int) (Math.random() * 40D));
try {
Thread.sleep(2000);

} catch (final InterruptedException e) {
throw new RuntimeException(e);

}
final long endTime = System.currentTimeMillis();
final NumberFormat formatter = new DecimalFormat("#0.00000");
System.out.println("Thread Id - " + this.threadLocal.get() + " Execution time is " + formatter.format((endTime - startTime) / 1000d) + " seconds" + "\n");
}

public static void main(final String[] args) {
final ThreadLocalExample threadLocalExample = new ThreadLocalExample();
final Thread t1 = new Thread(threadLocalExample);
final Thread t2 = new Thread(threadLocalExample);
t1.start();
t2.start();
}
}
In this example, ThreadLocalExample class implements a Runnable interface that helps execute the thread. Runnable interface’s run() method is implemented in this class that sets the ThreadLocal value and gets the program’s start and end time in milliseconds.
Thread.sleep() blocks the thread for 2000 milliseconds (i.e., 2 seconds). Finally, the total time to run the program is printed in decimals.
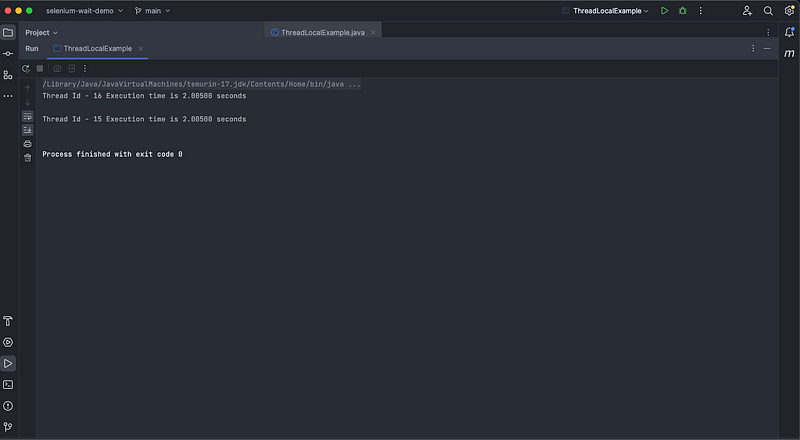
Test Execution
The following screenshot from IntelliJ shows that the total time to execute the program was 2.00500 seconds. This includes 2 seconds blocked by Thread.sleep().
Why is using Thread.sleep() discouraged?
Thread.sleep() is a blocking call that halts the execution for some time and helps the automation tests to proceed successfully, with all the respective elements getting loaded for interaction.
Problem 1
Imagine putting Thread.sleep() in Java with 5 seconds stop time at 5 different places in the test. We are putting in 25 seconds of hard waits in the test.
Thread.sleep() once set is set for the session’s lifetime.
Problem 2
Next problem we may face with Thread.sleep() in Java is that we might need to change the time duration if the time required for locating the element or performing action over the element keeps changing. For example, while running the test for the first time, the 3 seconds wait time worked fine with the sleep() method to locate an element and perform a click on it. However, in the next run, tests failed, and the duration was required to increase to 5 seconds.
This happens as fixed time duration is a flaky approach as locating elements also depends on external factors like rendering time, internet speeds, etc., some of which are not under our control. Flaky internet speeds can also cause the tests to fail even after adding Thread.sleep().
Problem 3
Another problem is the repetitive code we would require to add by adding the Thread.sleep() statement multiple times in the code. The statement must be applied before locating the web element or performing an action. In case multiple elements need some wait, we will have to add Thread.sleep() statements multiple times in the code, and there will be a time when our code will be mostly covered with Thread.sleep() statements.
We can use Selenium’s Waits to overcome this problem of hard waits. In the next section of this blog on the Thread.sleep() in Java, let’s study different types of Selenium Waits and how to implement them in the tests.
Looking to manage your tests more efficiently? In this blog, explore a variety of test case management tools and select the one that suits your team’s needs:
Selenium Waits
Selenium Waits are the best replacement for Thread.sleep() as they help execute the automated UI tests seamlessly on the browser. The issues that may arise due to variations in time lag can be easily handled using Selenium Waits. There are three types of Waits in Selenium WebDriver:
Implicit Wait
Explicit Wait
Fluent Wait
Implicit Wait in Selenium WebDriver
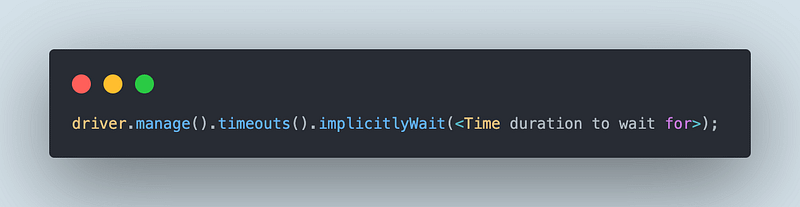
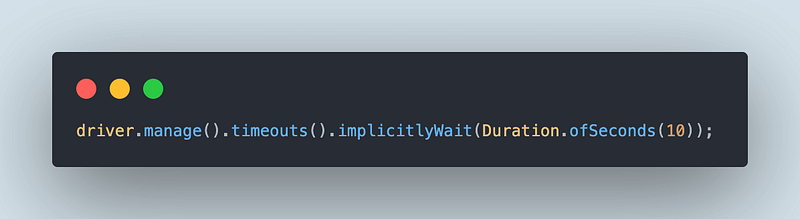
Implicit wait is useful when certain elements on the web page are not available immediately and need some time to load. This wait polls the DOM for a certain duration as specified in the wait. By default, implicit wait is set to 0 and is disabled. Once set in tests, it is set for the session’s life.
implicitlyWait() method is available in the timeouts() interface in Selenium WebDriver. It accepts one parameter, that is, duration of time. This parameter can be supplied using the Duration class from java.time package.
Once implicit wait is set in the test, it is non-blocking and does not wait for the entire time duration like Thread.sleep(). This saves 5 seconds, whereas Thread.sleep() will halt the code execution in the current thread for a full 10 seconds and then only move to the next line.
If the web element is not found in the time duration set for the implicit wait, NoSuchElementException will be thrown. You can learn more about it through this blog on Common Selenium Exceptions.
Syntax
Code Example
driver.manage().timeouts().implicitlyWait(Duration.ofSeconds(10));
Explicit Wait in Selenium WebDriver
Explicit wait allows the test to wait for a certain time until the expected condition as specified in wait is met. It is applied for a single web element to load, unlike implicit wait, which applies to all the elements on the web page.
Applying explicit wait is non-blocking and does not wait for the entire session life cycle like Thread.sleep().
When the expected condition is not met within the specified time, explicit wait throws TimeoutException.
Syntax
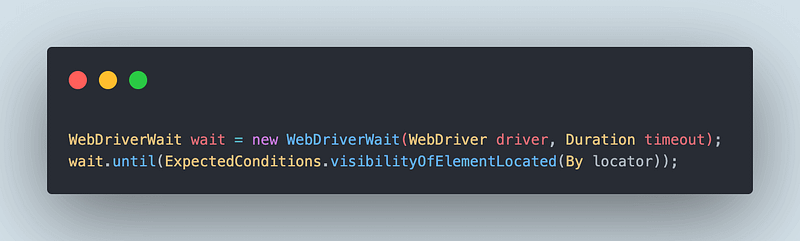
For setting the explicit wait, we first need to instantiate the WebDriverWait class. This class needs an instance of WebDriver and time duration as constructor values. The ExpectedConditions can be set next by using the until() method.
Here is the list of some commonly used ExpectedConditions in explicit wait:
| Expected Condition | Description |
| visibilityOfElementLocated(By locator) | This condition checks that the element is present in the DOM and visible. This condition expects a By locator as a parameter for the method. |
| visibilityOf(WebElement element) | This condition checks that the element is present in the DOM and is visible. It expects a WebElement as a parameter for the method. |
| alertIsPresent() | This condition checks if the alert is present. |
| elementToBeClickable(By locator) | This condition checks that the element is present and visible and can be clicked. It expects a By locator as a parameter for the method. |
| elementToBeClickable(WebElement element) | This condition checks that the element is present, visible, and can be clicked. It expects a WebElement as a parameter for the method. |
| presenceOfElementLocated(By locator) | This condition checks that the element is present on the page using its By locator. |
| textToBePresentInElement(WebElement element, final String text) | This condition checks that the text is present in the WebElement. |
| textToBePresentInElementLocated(By locator, final String text) | This condition checks that the text in the WebElement matches the given locator. |
You can learn more about it through this blog on ExpectedConditions in Selenium.
The ultimate guide to software testing metrics: definition, types, and examples explained for informed decisions. Enhance your testing process now.
Code Example
WebDriverWait wait = new WebDriverWait(driver, Duration.ofSeconds(5));
WebElement checkoutBtn = driver().findElement(By.cssSelector("#check"));
wait.until(ExpectedConditions.visibilityOf(checkoutBtn));
In the example above, the Checkout button on the web page is located using explicit wait. First, the WebDriverWait class is instantiated, providing the driver instance and time duration for the explicit wait. Next, the Checkout button is located and stored as a WebElement. Finally, the expected condition is written to wait until the Checkout button is visible.
As per Selenium’s best practice, it is recommended not to mix the implicit and explicit waits as it might lead to unpredictable wait times. For example, if an implicit wait of 10 seconds is
provided and an explicit wait of 15 seconds is also used, it might cause a timeout to occur after 20 seconds.
Fluent Wait in Selenium WebDriver
Fluent wait allows you to wait for a maximum amount of time for a condition. It also allows to add the following two additional parameters to wait for that are not allowed in implicit and explicit waits –
Polling Frequency
Ignore Exceptions
Polling Frequency
It sets the frequency in which the condition should be checked. For example, the total timeout can be set for 10 seconds with a polling frequency of 2 seconds, i.e., the condition will be checked for 10 seconds in every 2 seconds frequency.
Ignore Exceptions
With fluent waits, we can also set it to ignore the exception that can appear while waiting for the condition. For example, the total timeout can be set to 10 seconds polling every 2 seconds and ignoring “NoSuchElementException”.
Note: If the fluent wait condition is not fulfilled within the specified time, it will throw TimeoutException.
Syntax
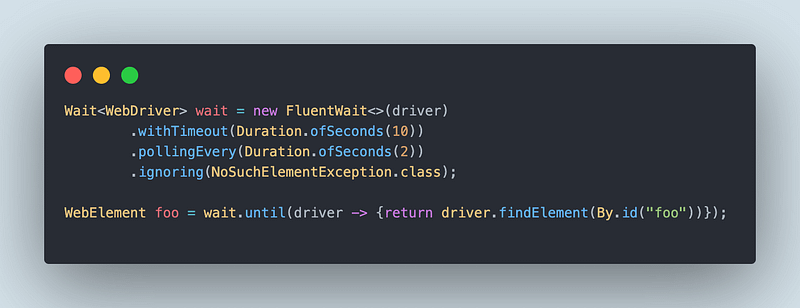
For setting fluent wait, we need to use the Wait interface and instantiate an instance of FluentWait class. After instantiating the FluentWait class, we can chain its following methods:
withTimeout(): Accepts the total time for which the wait needs to be implemented.
pollingEvery(): Accepts the polling frequency time duration.
ignoring(): Provides the exception name, which the fluent wait needs to ignore while waiting for the condition to be fulfilled.
Code Example
public String successMessageText() {
Wait<WebDriver> wait = new FluentWait<>(driver)
.withTimeout(Duration.ofSeconds(10))
.pollingEvery(Duration.ofSeconds(2))
.ignoring(NoSuchElementException.class);


WebElement successMessage = wait.until(driver -> notificationPopUp().findElement(By.tagName("p")));
return successMessage.getText();
In the above code example, a fluent wait has been implemented for 10 seconds that will be polling at a frequency of 2 seconds ignoring NoSuchElementException. This fluent wait will be used for locating the successMessage text from a web element, and finally, the text will be returned in String format.
Let’s now delve into coding and check out how to use Thread.Sleep() in Java. We will also check out how to use implicit, explicit, and fluent waits using Selenium WebDriver.
This tutorial focuses on mobile ui testing, its significance, benefits, strategies, challenges, and best practices.
How to use Thread.sleep(), Implicit Wait, Explicit Wait, and Fluent Waits?
Before I take you on the tour of Thread.sleep() in Java and Selenium Waits, let’s first discuss the Application Under Test (AUT), the tools used, and the test automation strategy.
Application Under Test:
We will use LambdaTest’s eCommerce playground to demo Thread.sleep() in Java and the different Selenium Waits.
Tools/Language used for running tests
Following tools/language has been used in writing and running the tests:
Programming Language: Java
Mobile App Automation Tool: Selenium WebDriver (Version 4.10.0)
Test Runner: TestNG (Version 7.8.0)
Build Tool: Maven
Cloud Platform to run the tests: LambdaTest.
Test Scenario
Launch the LambdaTest’s eCommerce playground.
Search for a product using the search box on the Home Screen.
On the product page, hover the mouse on the product.
Click on the Add to Cart button.
Click on the Checkout button on the pop-up message displayed.
We must wait for the pop-up to appear and get the success message text. Next, we need to click on the Checkout button to checkout the product from the cart.
In the demo, we will first use the Thread.sleep() in Java to pause the test execution and then will use the explicit and fluent waits to replace Thread.sleep() and remove the hard waits from the test.
Before we move to product checkout, we need to perform two steps: logging in to the website and searching for a product, and finally, adding the product to the cart.
The following screen will be used to log in to the website.

The following screen will be used to search for the product.
As this blog on Java automation testing focuses more on Thread.sleep() in Java and Selenium Waits, I will provide a minimal explanation of the two steps, i.e., logging in to the website and searching for a product.

Implementation
The project has been created using Maven, and the following image shows the structure of the project.

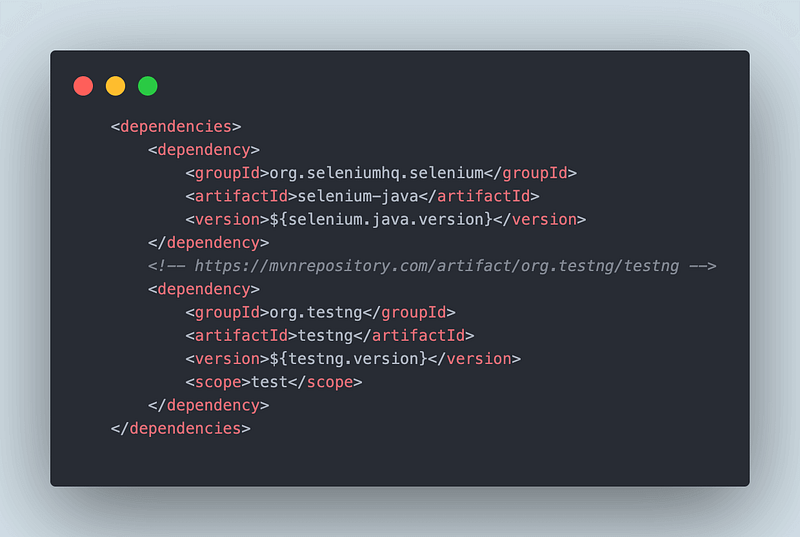
Once the project is built, we need to add the dependencies for Selenium WebDriver and TestNG in the pom.xml. I preferably follow the best practice of including all the dependencies in the properties tab block in the pom.xml file. You can find out the details in the following screenshots:
Dependencies in pom.xml
Properties block in pom.xml

FileName — pom.xml
<project xmlns="http://maven.apache.org/POM/4.0.0" xmlns:xsi="http://www.w3.org/2001/XMLSchema-instance"
xsi:schemaLocation="http://maven.apache.org/POM/4.0.0 http://maven.apache.org/xsd/maven-4.0.0.xsd">
<modelVersion>4.0.0</modelVersion>

<groupId>io.github.mfaisalkhatri</groupId>
<artifactId>selenium-wait-demo</artifactId>
<version>1.0-SNAPSHOT</version>
<packaging>jar</packaging>

<name>selenium-wait-demo</name>
<url>http://maven.apache.org</url>

<properties>
<project.build.sourceEncoding>UTF-8</project.build.sourceEncoding>
<selenium.java.version>4.10.0</selenium.java.version>
<testng.version>7.8.0</testng.version>
<maven.compiler.version>3.11.0</maven.compiler.version>
<surefire-version>3.1.2</surefire-version>
<java.release.version>17</java.release.version>
<maven.source.encoding>UTF-8</maven.source.encoding>
<suite-xml>testng.xml</suite-xml>
<argLine>-Dfile.encoding=UTF-8 -Xdebug -Xnoagent</argLine>
</properties>

<dependencies>
<dependency>
<groupId>org.seleniumhq.selenium</groupId>
<artifactId>selenium-java</artifactId>
<version>${selenium.java.version}</version>
</dependency>
<!-- https://mvnrepository.com/artifact/org.testng/testng -->
<dependency>
<groupId>org.testng</groupId>
<artifactId>testng</artifactId>
<version>${testng.version}</version>
<scope>test</scope>
</dependency>
</dependencies>
<build>
<plugins>
<plugin>
<groupId>org.apache.maven.plugins</groupId>
<artifactId>maven-compiler-plugin</artifactId>
<version>${maven.compiler.version}</version>
<configuration>
<release>${java.release.version}</release>
<encoding>${maven.source.encoding}</encoding>
<forceJavacCompilerUse>true</forceJavacCompilerUse>
</configuration>
</plugin>
<plugin>
<groupId>org.apache.maven.plugins</groupId>
<artifactId>maven-surefire-plugin</artifactId>
<version>${surefire-version}</version>
<executions>
<execution>
<goals>
<goal>test</goal>
</goals>
</execution>
</executions>
<configuration>
<useSystemClassLoader>false</useSystemClassLoader>
<properties>
<property>
<name>usedefaultlisteners</name>
<value>false</value>
</property>
</properties>
<suiteXmlFiles>
<suiteXmlFile>${suite-xml}</suiteXmlFile>
</suiteXmlFiles>
<argLine>${argLine}</argLine>
</configuration>
</plugin>
</plugins>
</build>
</project>
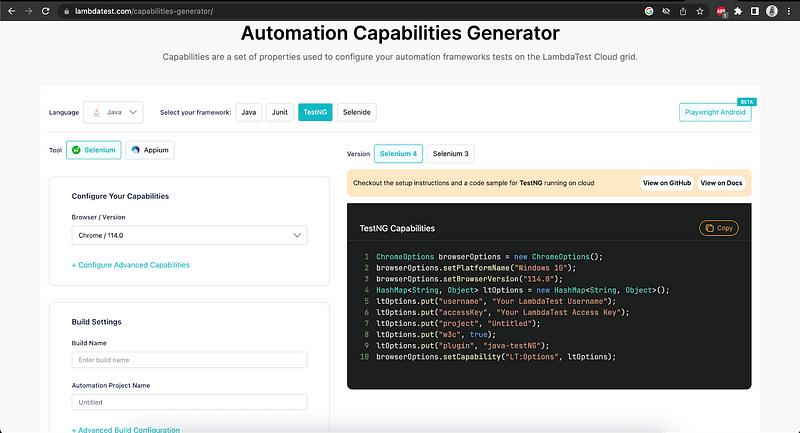
The tests will be run on the Google Chrome browser on LambdaTest’s Cloud grid using Windows 10 Operating System. To set the browser, OS, and its respective version, we can use the LambdaTest Capabilities Generator.
Discover the ins and outs of UX testing with this comprehensive guide. Explore various testing methods, tools, and best practices for measuring success
Implementing Implicit Wait in Selenium
Once we know what capabilities we need to set in the cloud, we will create a DriverManager class that will help set up the browser in the cloud.
Following is the code implementation of the DriverManager class.
FileName — DriverManager.class
public class DriverManager {
WebDriver driver;
private static final String LT_USERNAME = System.getProperty("LT_USERNAME");
private static final String LT_ACCESS_KEY = System.getProperty("LT_ACCESS_KEY");
private static final String GRID_URL = "@hub.lambdatest.com/wd/hub";
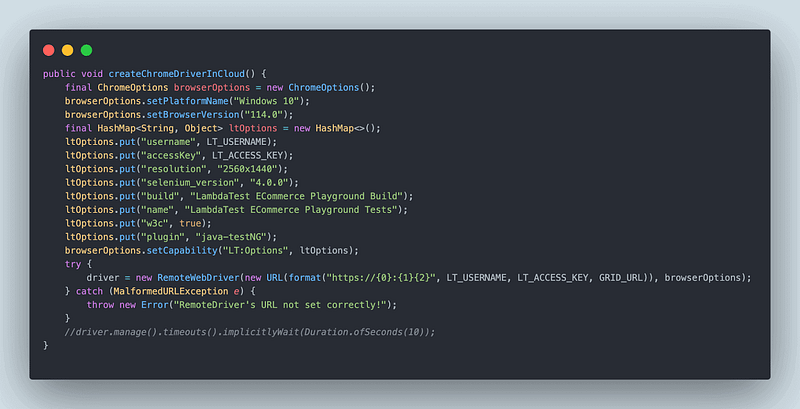
public void createChromeDriverInCloud() {
final ChromeOptions browserOptions = new ChromeOptions();
browserOptions.setPlatformName("Windows 10");
browserOptions.setBrowserVersion("114.0");
final HashMap<String, Object> ltOptions = new HashMap<>();
ltOptions.put("username", LT_USERNAME);
ltOptions.put("accessKey", LT_ACCESS_KEY);
ltOptions.put("resolution", "2560x1440");
ltOptions.put("selenium_version", "4.0.0");
ltOptions.put("build", "LambdaTest ECommerce Playground Build");
ltOptions.put("name", "LambdaTest ECommerce Playground Tests");
ltOptions.put("w3c", true);
ltOptions.put("plugin", "java-testNG");
browserOptions.setCapability("LT:Options", ltOptions);
try {
driver = new RemoteWebDriver(new URL(format("https://{0}:{1}{2}", LT_USERNAME, LT_ACCESS_KEY, GRID_URL)), browserOptions);
} catch (MalformedURLException e) {
throw new Error("RemoteDriver's URL not set correctly!");
}
driver.manage().timeouts().implicitlyWait(Duration.ofSeconds(10));
}
public void createChromeDriverLocal() {
driver = new ChromeDriver();
}
public WebDriver getDriver() {
return this.driver;
}
public void quitDriver() {
driver.quit();
}
}
Code Walkthrough
The first two variables declared in the class will help us read LambdaTest’s cloud login credentials, i.e., Username and AccessKey, on runtime, as these are secret variables and can not be declared as hard-coded values in the code. These values will be set in the createChromeDriverInCloud() method.
createChromeDriverInCloud() method in DriverManager class
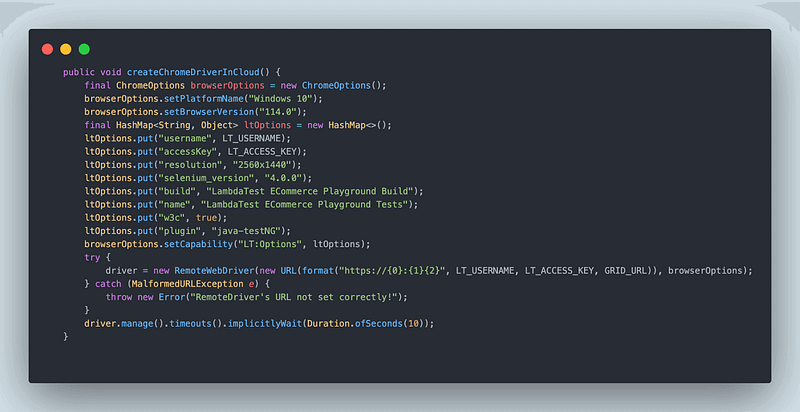
This method will create a new Chrome browser instance on LambdaTest Cloud Grid. After the driver is set, the implicit wait will be set for 10 seconds using the following statement in the above method –
Implementing the Test Scenarios
Scenario 1
The first scenario we need to implement is the Login Scenario. This will help you log in to the website and perform further actions of adding the product to the cart and checking out easily. The code snippet of the testLogin() method is available in the LambdaTestEcommerceTests class.
LambdaTestEcommerceTests class
public class LambdaTestEcommerceTests extends BaseTest{

@Test
public void testLogin() {
HomePage homePage = new HomePage(driverManager.getDriver());
homePage.navigateToLoginPage();
LoginPage loginPage = new LoginPage(driverManager.getDriver());
loginPage.login(System.getProperty("username"),System.getProperty("password"));
assertEquals(loginPage.getMyAccountPageHeader(),"My Account");
}
}
The testLogin() method will help in navigating to the Login Page and allow performing the login to the LambdaTest eCommerce website. The Username and Password for login will be supplied on run time. Finally, assertions will be performed to check that the page header should be “My Account” after successful login.
Login link on Home Page
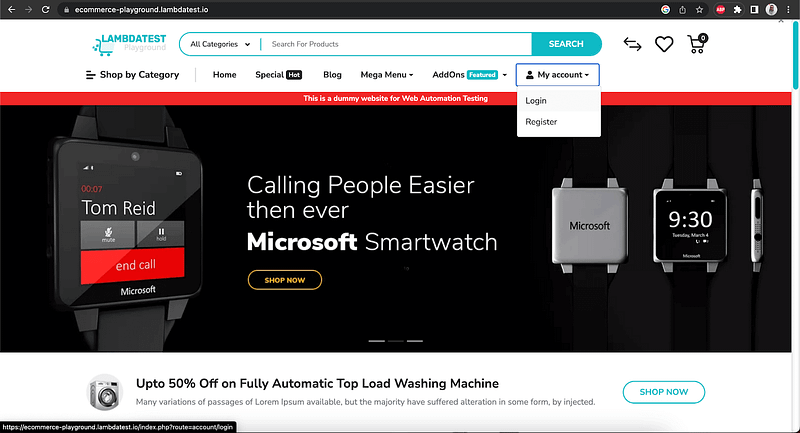
Login Page
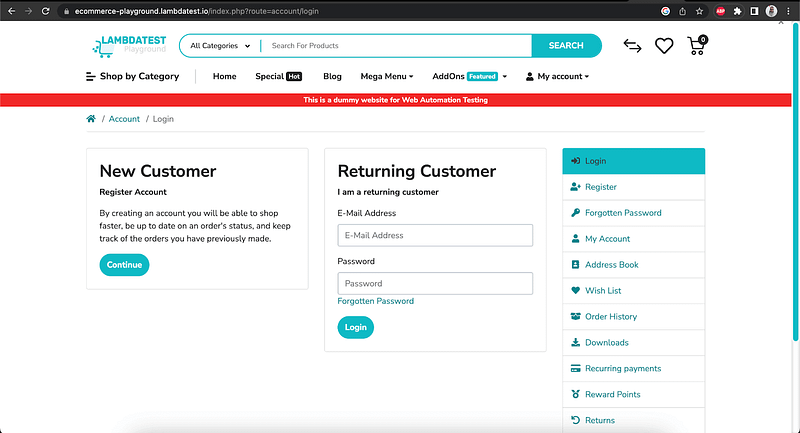
Account Page after successful login

Below is the code snippet from the HomePage class that has all the Page Objects for Home Page.
Explore our comprehensive guide on GUI Testing, uncovering its vital role in software development. Learn about its different types, best practices, and steps for effective implementation to enhance your software’s user interaction.
The Page Object Model helps segregate the page objects with the actions, enabling easy code maintenance. It is a popular design pattern used in test automation to enhance the maintainability and reusability of test code, particularly in web-based applications. It achieves this by segregating the web elements on a page from the test actions performed on those elements.
public class HomePage {
WebDriver driver;

public HomePage(WebDriver driver) {
this.driver = driver;
}

private WebElement searchField() {
return driver.findElement(By.name("search"));
}

private WebElement searchBtn() {
return driver.findElement(By.cssSelector("button[type='submit'][class='type-text']"));
}

public void searchProduct(String productName) {
searchField().clear();
searchField().sendKeys(productName);
searchBtn().click();
}

public String searchResultText() {
return driver.findElement(By.cssSelector("div.product-layout:nth-child(1) div:nth-child(1) h4 > a.text-ellipsis-2")).getText();
}

public void navigateToLoginPage() {
driver.findElement(By.linkText("My account"))
.click();
driver.findElement(By.linkText("Login")).click();
}
}
The BaseTest class is extended by LambdaTestEcommerceTests class. The BaseTest class has two methods, namely, testSetup() and tearDown(). The testSetup() method helps instantiate the DriverManager class and calls the createChromeDriverInCloud() to run the tests on the Chrome browser in the LambdaTest cloud grid. The tearDown() method helps in gracefully quitting the WebDriver after the tests are run.
public class BaseTest {

DriverManager driverManager;

@BeforeTest(alwaysRun = true)
public void testSetup() {
driverManager = new DriverManager();
driverManager.createChromeDriverInCloud();
driverManager.getDriver().get("https://ecommerce-playground.lambdatest.io/");
}

@AfterTest(alwaysRun = true)
public void tearDown() {
driverManager.quitDriver();
}
}
Scenario 2
The next scenario is to search for a product from the Home Page after logging in to the website.
Search products from the Home Page
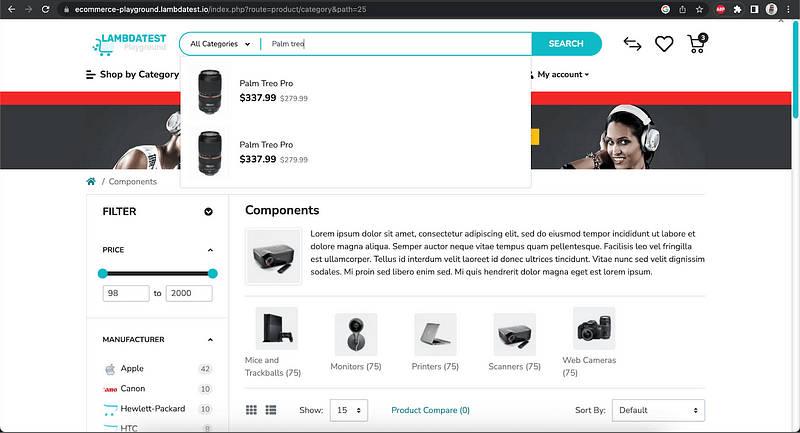
Search results
Following is the test to search for the product.
@Test
public void testSearchProduct() {
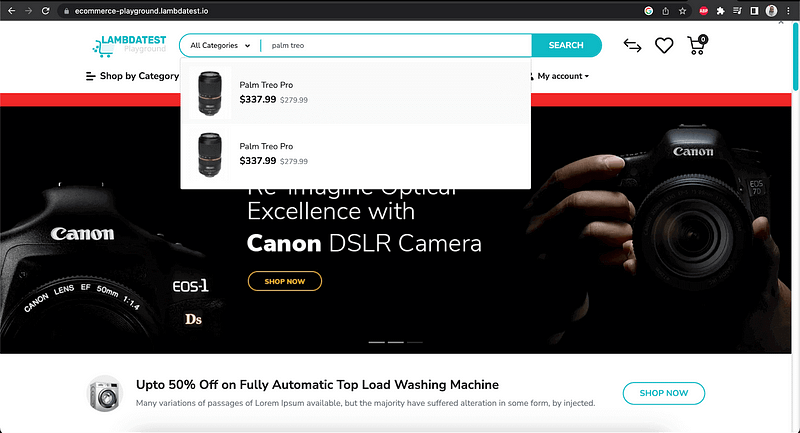
String productName = "Palm Treo Pro";
HomePage homePage = new HomePage(driverManager.getDriver());
homePage.searchProduct(productName);
assertEquals(homePage.searchResultText(), productName);
}
“Palm Treo Pro” is the product that will be searched from the website’s Home Page; after the results appear, the text will be asserted against it.
The following method — searchProduct() from the HomePage class will help us search the product, and the searchresultText() method will help us verify the search result text.
Looking to manage your tests more efficiently? In this blog, explore a variety of test case management tools and select the one that suits your team’s needs.

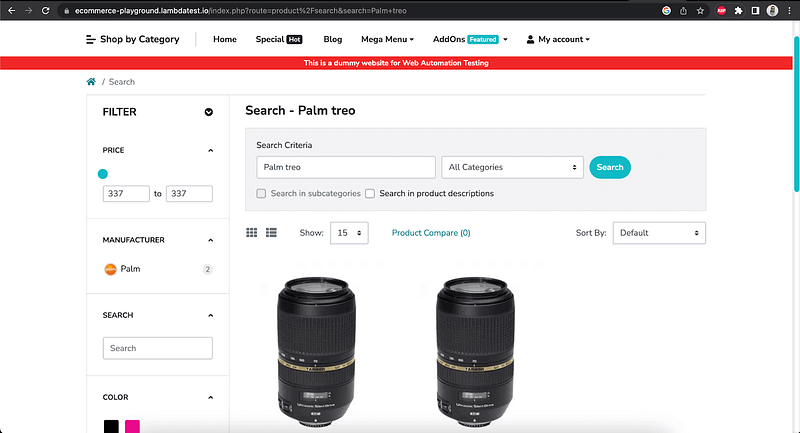
Scenario 3
In this scenario, the add product to the cart step will be automated. To add products to the cart, we need to hover on the product and click on the “add to cart” icon after the hovering toolbar appears.
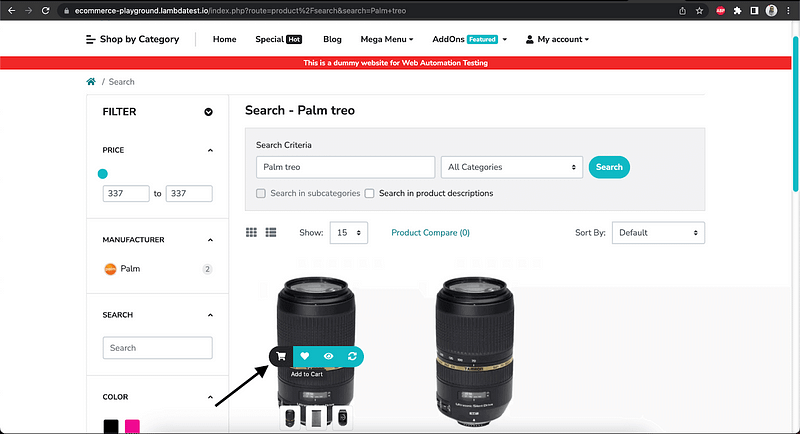
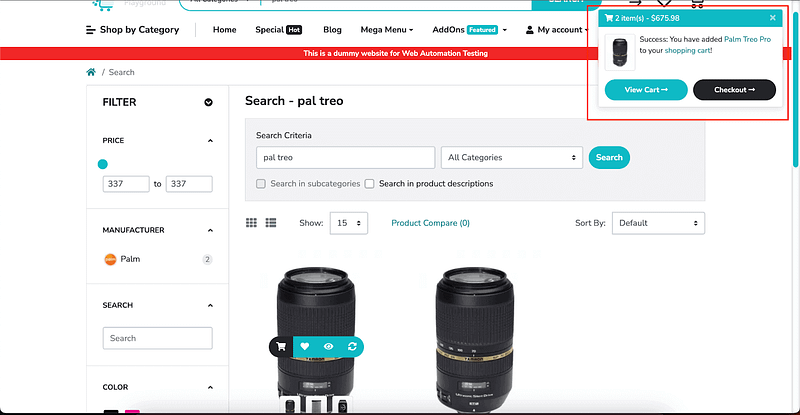
Next, a pop-up message will appear showing the success message for adding the product to the cart with the Checkout button. We will be asserting the success message and clicking on the Checkout button.
Implementing Thread.sleep() in Selenium
Below code is of the testAddProductToCart() method that performs all the actions mentioned in the earlier paragraph.
testAddProductToCart() in LambdaTestEcommerceTests class
@Test
public void testAddProductToCart() {
ProductPage productPage = new ProductPage(driverManager.getDriver());
productPage.addPalmTreoCameraLensToCart();
final String expectedMessage = "{0}\n{1}\n{2}\n{3}\n{4}";
assertEquals(productPage.successMessageText(), format(expectedMessage, "Success: You have added", "Palm Treo Pro", "to your",
"shopping cart", "!"));
productPage.checkoutProduct();
}
ProductPage class is created for storing the product page web elements and interacting with them.
public class ProductPage {
WebDriver driver;
public ProductPage(WebDriver driver) {
this.driver = driver;
}
public void addPalmTreoCameraLensToCart() {
final Actions actions = new Actions(driver);
actions.moveToElement(palmTreoCameraLens())
.pause(200)
.moveToElement(addToCartBtn())
.pause(100)
.click()
.perform();
}
public void checkoutProduct() {
checkoutBtn().click();
}
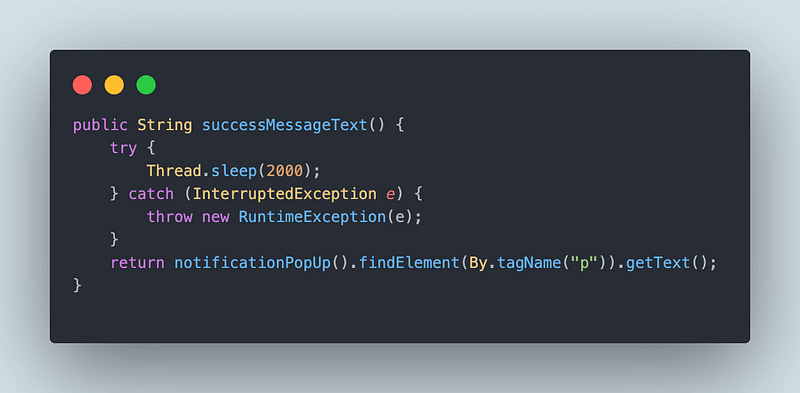
public String successMessageText() {
try {
Thread.sleep(2000);
} catch (InterruptedException e) {
throw new RuntimeException(e);
}
return notificationPopUp().findElement(By.tagName("p")).getText();
}
private WebElement addToCartBtn() {
return driver.findElement(By.cssSelector("div.product-action > button.btn.btn-cart.cart-29"));
}
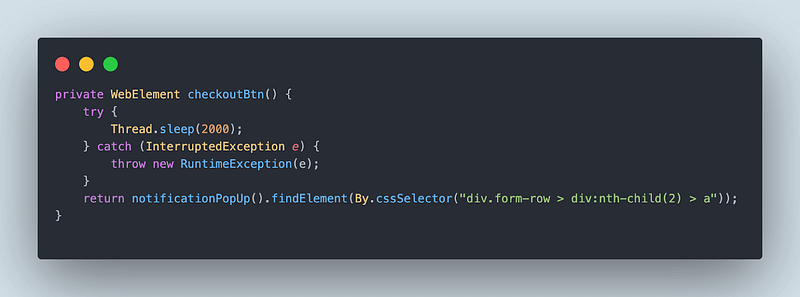
private WebElement checkoutBtn() {
try {
Thread.sleep(2000);
} catch (InterruptedException e) {
throw new RuntimeException(e);
}
return notificationPopUp().findElement(By.cssSelector("div.form-row > div:nth-child(2) > a"));
}
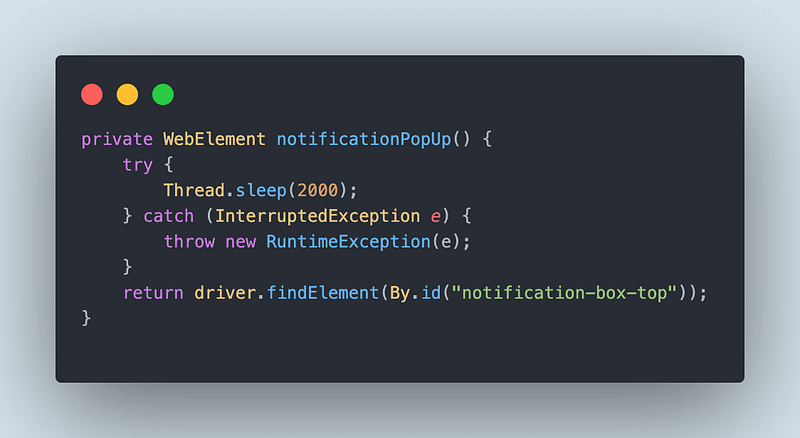
private WebElement notificationPopUp() {
try {
Thread.sleep(2000);
} catch (InterruptedException e) {
throw new RuntimeException(e);
}
return driver.findElement(By.id("notification-box-top"));
}
private WebElement palmTreoCameraLens() {
return driver.findElement(By.cssSelector(".product-layout"));
}
}
As mentioned earlier, we need to wait for the pop-up notification to appear. The following method notificationPopUp() has Thread.sleep() implemented, which pauses the test for 2 seconds to wait for the notification to appear. In this method, try catch block is used for implementing Thread.sleep() as it is more convenient and helps catch the run time exceptions. Once try catch is implemented, we don’t have to put the words throws InterruptedException in every method that uses this notificationPopUp() method, which has Thread.sleep() in it.
Likewise, Thread.sleep() in Java is used in the successMessageText() method as well, as we need to wait for a success message to appear to get its text.
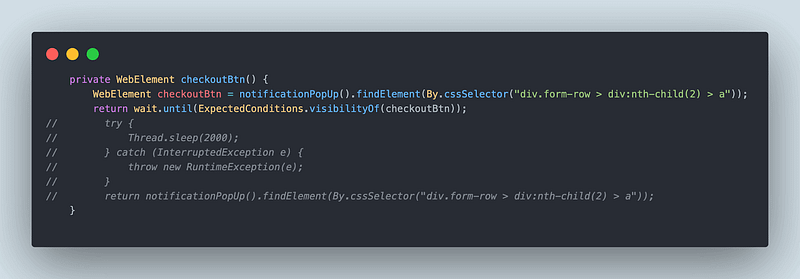
Similarly, Thread.sleep() in Java pauses the test for locating the Checkout button. Here is the code snippet for the checkoutBtn() method that returns the web element for the checkout button.
Test Execution
Let’s execute the tests using testng.xml by right-clicking on the file and selecting the option Run ...\testng.xml. Here we are using the cloud testing platform, LambdaTest to execute the tests.
LambdaTest is a digital experience cloud platform that lets you perform automation testing at scale on over 3000+ real desktop and mobile browsers. Just like the Thread.sleep() in Java helps you pause test execution for a certain amount of time, running tests on a cloud-based grid will further improve the accuracy of your tests.
The ultimate guide to software testing metrics: definition, types, and examples explained for informed decisions. Enhance your testing process now.
Moreover, running your automated tests in parallel will cut down your test execution time, enabling faster Selenium Java testing to ensure a quality web experience.
To run tests on LambdaTest, we need to enter the following values to execute the tests successfully.
LambdaTest Username
LambdaTest AccessKey
Username of LambdaTest eCommerce Website
Password of LambdaTest eCommerce Website
Username and Password for LambdaTest’s eCommerce Website must be supplied for successfully logging in to the website.
All the values can be supplied using the Edit configuration window and supplying the values as
-DLT_USERNAME=< LambdaTest Username> -DLT_ACCESS_KEY=< LambdaTest Access Key > -Dusername=< Website username for login scenario > -Dpassword=< Website password for login scenario >
<?xml version="1.0" encoding="UTF-8"?>
<!DOCTYPE suite SYSTEM "http://testng.org/testng-1.0.dtd">
<suite name="LambdaTest ecommerce playground website test suite ">
<test name="Search Product tests " >
<classes>
<class name="io.github.mfaisalkhatri.tests.LambdaTestEcommerceTests">
<methods>
<include name="testLogin"/>
<include name="testSearchProduct"/>
<include name="testAddProductToCart"/>
</methods>
</class>
</classes>
</test> <!-- Test -->
</suite> <!-- Suite -->
Screenshot of the test run locally using TestNG in IntelliJ
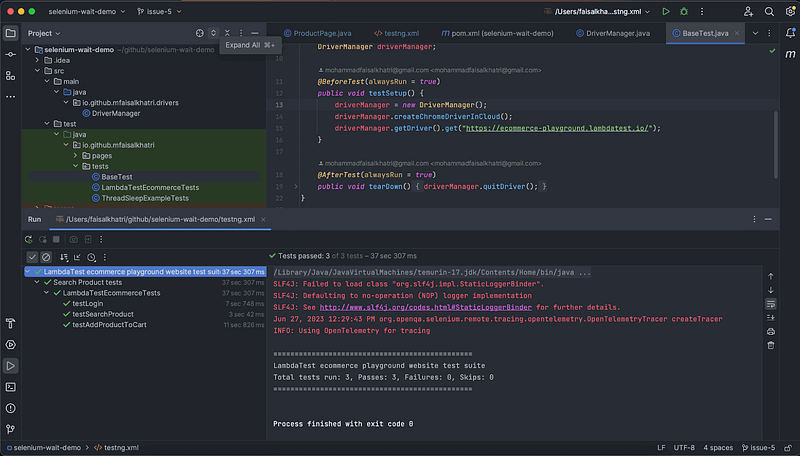
The total time taken to run the tests can be seen as 37 Seconds and 307 ms, this includes the hard waits we have implemented using Thread.sleep() in the tests.
Let’s now check out how to replace the Thread.sleep() in Java with the explicit and fluent wait to take down the hard waits from the tests and save test execution time.
Implementing Explicit Wait and Fluent Wait in Selenium
There are three methods in the ProductPage class, namely, notificationPopUp(), successMessageText(), and checkoutBtn(), where we have used Thread.sleep() in Java for pausing the test execution. Hence, our tests run smoothly by locating and interacting with the web elements on the Product Page. The Thread.sleep() statements in the code are commented out and have been kept to let us know that it was replaced with explicit and fluent waits in its place, so we know where the hard waits were replaced.
Note: It is not a good practice to keep commented code in the class. Once the code refactoring is done, the commented code should be removed.
Replacing Thread.sleep() with Fluent Wait
Let’s use the fluent wait in the successMessageText() method and replace it with Thread.sleep() in Java.
successMessageText() method in ProductPage class
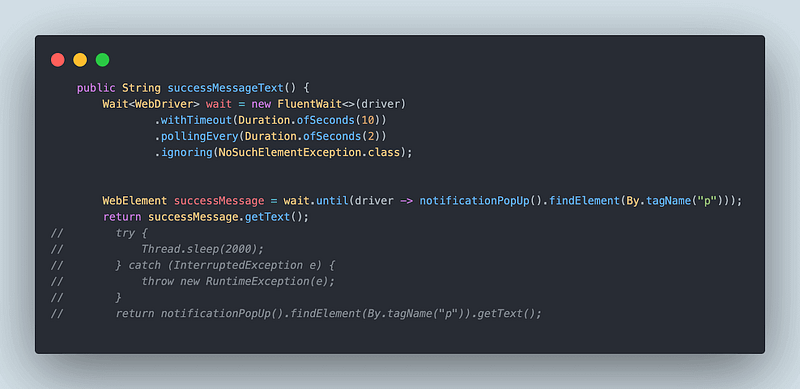
The fluent wait is defined for 10 seconds polling every 2 seconds ignoring NoSuchElementException. So, if the element is located within 10 seconds, it will move to the next statement of code rather than waiting for a full timeout of 10 seconds to complete. This is the benefit of using Selenium Waits.
Once the web element for successMessage is located using the fluent wait condition. successMessageText() method will return its text.
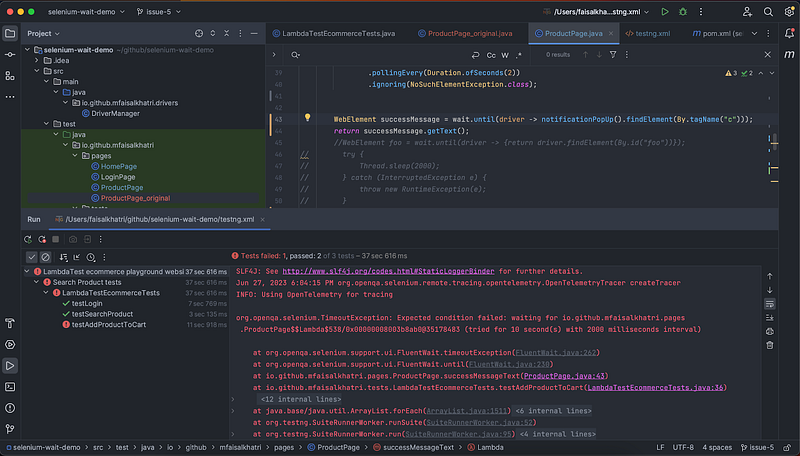
Note: If the web element is not located within 10 seconds, the fluent wait will throw TimeoutException. The following screenshot shows the TimeoutException printed in the console in IntelliJ.
Replacing Thread.sleep() with Explicit Wait
It is now time to refactor the notificationPopup() method and checkoutBtn() method by removing the Thread.sleep() in Java and replacing it with the explicit wait. As we will be using the explicit wait in two methods, it is better to declare it globally, instantiate it in the class’s constructor, and use it in the respective methods.
This tutorial focuses on mobile ui testing, its significance, benefits, strategies, challenges, and best practices.
Declaring WebDriverWait
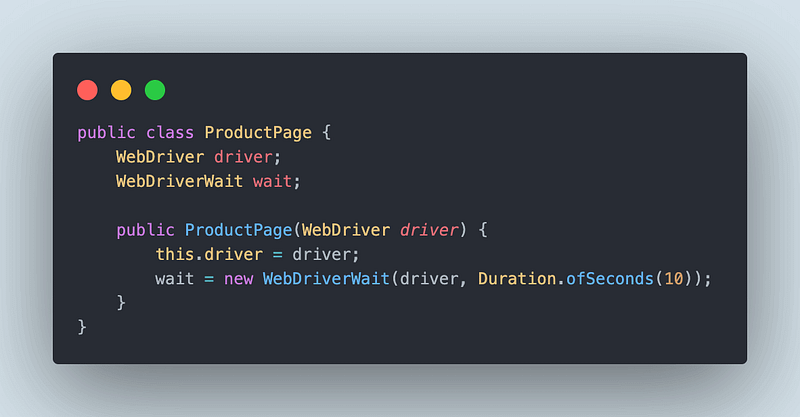
Once the instantiation of the WebDriverWait class is done, we are good to use it in the notificationPopUp() and checkoutBtn() methods.
notificationPopUp() method
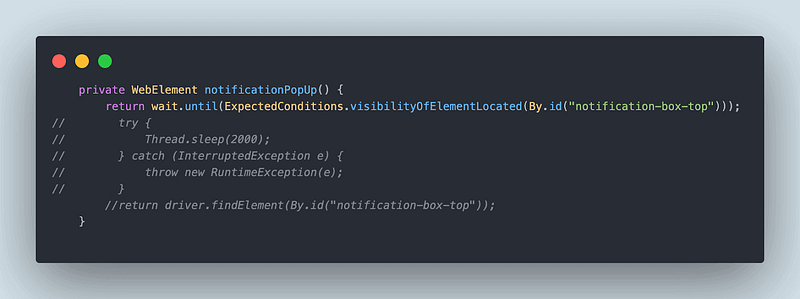
Using explicit wait, ExpectedCondition — visibilityOfElementLocated() using By locator is used in this method to wait for the notification box to appear.
If the element is not located within the explicit wait timeout of 10 seconds, TimeoutException will be thrown.
The following screenshot shows the TimeoutException printed in the console in IntelliJ.
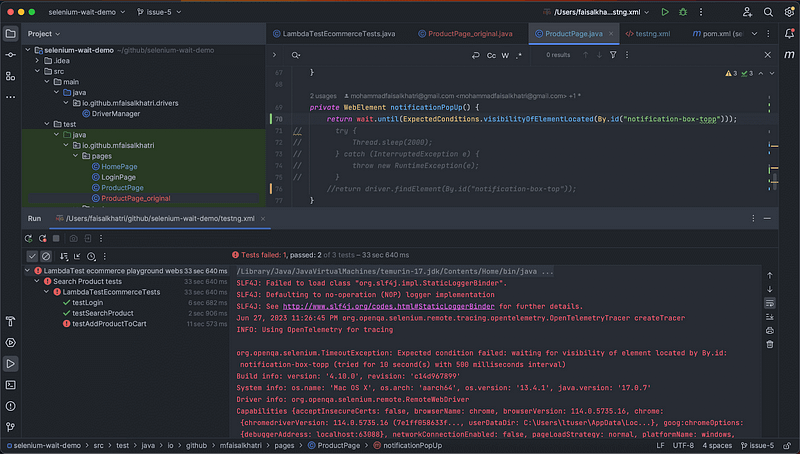
Coming to the checkoutBtn() method, Thread.sleep() in Java has been replaced by using the ExpectedCondition — visibilityOf() method, where a web element is supplied in its parameter.
Before running the tests, let’s remove the implicit wait that we had added in the createChromeDriverInCloud() method in DriverManager class.
Test Execution
Let’s execute the tests using testng.xml by right-clicking on the file and selecting the option Run ...\testng.xml. As discussed earlier, the following values can be supplied using the Edit configuration window.

Screenshot of the test run locally using TestNG in IntelliJ:
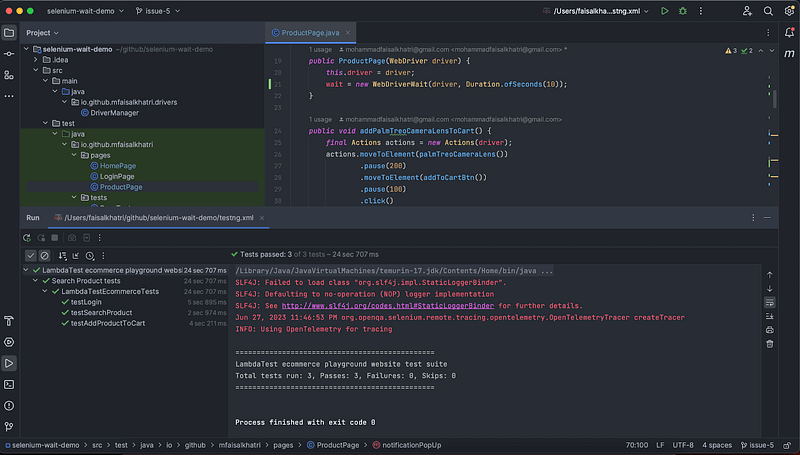
It can be seen that the test execution time has reduced to 24 seconds 707 ms. This shows that Selenium’s explicit and fluent waits are powerful and can help in bringing down the test execution time and also make the code more readable, maintainable, and less flaky.
If you desire to excel in automation testing and improve your Java skills, enrolling in a Selenium Java 101 certification program is an excellent first step toward becoming an automation testing expert. This program will equip you with a robust understanding of using Selenium Java for testing and pave the way for a promising career in this field.
Explore our in-depth guide comparing Protractor vs Selenium to make informed decisions for your test automation needs. Gain valuable insights into the key differences, advantages, and ideal use cases of these widely-used testing frameworks.
Conclusion
Though Thread.sleep() in Java can be used for pausing the test execution for a certain time, it is not a good option to use it in your automation tests as it is a kind of hard wait and can eat up most of the test execution time.
Instead, implicit, explicit, and fluent waits in Selenium WebDriver can be used. These are more advanced waits and can help to pause the test for a certain time to find the locator/wait for the expected condition to be fulfilled and execute the rest of the code as soon as the element is found. It is recommended to refactor your code and use Selenium Waits wherever possible to save the test execution time and keep your tests less flaky.
Happy Testing!!