How To Automate ServiceNow With Appium

I'm a Software Testing Professional having 14+ years of experience in automation as well as manual testing. I'm a QA, freelancer, blogger and open source contributor.
As organizations and businesses grow, managing the Operations, HR, and IT activities becomes quite difficult. Let’s take an example of a company with a 5000+ workforce, where multiple vendors and contractors are assigned different roles. So, when it comes to managing contracts, licenses, and different ventures, it becomes a tedious task.
To resolve such complex situations of managing the different operation activities,
ServiceNow, a cloud platform, provides service, operations, and business management solutions that organizations use to manage their digital workflows and streamline their business processes.
So, if a contract needs to be extended for a contractor, the contractor can use the application built on top of ServiceNow to apply for an extension. Now, with businesses working remotely, mobile applications come quite handy, where the senior management team can provide approval on the go as soon as they see a notification in the mobile app.
Benefits of using ServiceNow on Mobile:
It can be rebranded as our app by adding your logo, color theme, splash Screen, etc.
Tailored experiences can be delivered for routine employee needs from a single app.
It simplifies development by creating a customized, elegant app for Android and iOS.
It can create an immediate impact by providing out-of-the-box workflows for common use cases with seamless connection to data.
However, before we move towards releasing the mobile application to the end-customers (ideally a business), it is necessary to test it to validate that all the functionalities are working as expected. In the context of digital experience, ensuring that a product or service is functional and performs seamlessly across different devices and screen sizes is essential. This is because customers today interact with digital platforms using various devices, such as desktops, laptops, tablets, and smartphones, and the screen size and specifications of these devices can vary widely.
When testing ServiceNow mobile applications, Appium is a popular choice among organizations. Appium is a widely used open-source mobile automation testing framework that can be used to test ServiceNow workflows for shipping a full-functional top-quality mobile application.
In this blog on ServiceNow with Appium, we will learn how to test ServiceNow using Appium to ensure the workflows and applications are working as expected, ultimately improving the overall efficiency and quality of the testing process.
Automated Functional Testing tests helps to ensure that your web app works as it was intented to. Learn more about functional tests, and how automating them can give you a faster release cycle
What is ServiceNow?
ServiceNow provides a cloud-based platform designed to keep up with the rapid pace of change in today’s world. This platform enables you to manage your daily operations effectively and plays a vital role in improving the digital experience for all users. With various tools and capabilities at its disposal, the platform offered by ServiceNow enables organizations to streamline their digital workflows, automate and optimize processes, and improve communication and collaboration. By unifying and digitizing operations, ServiceNow empowers organizations to discover more efficient and effective ways of making work flow smoothly.
Here are some figures from the QA 2022 and FY 2022 regarding ServiceNow business:

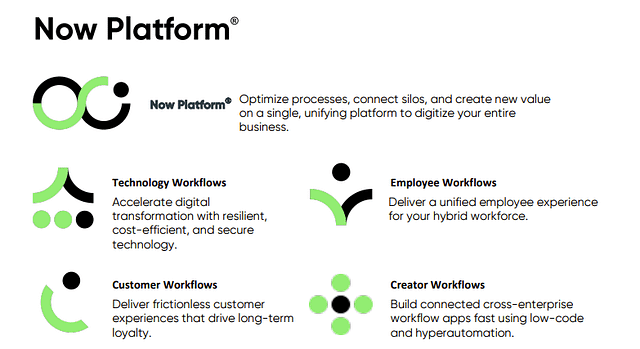
Now Platforms
The Now Platform is designed to streamline your entire business by optimizing processes and creating value through a unified platform. Explore the various Now Platform options below:
Black Box testing? Don’t worry; we will be covering what is Black box testing, merits, demerits, types & techniques.
Tokyo Release
ServiceNow follows a biannual schedule for its releases, with the most recent Tokyo release being launched in Q4 of 2022. The upcoming Utah release is expected to be rolled out in Q2 of 2023. To explore the features introduced in the Tokyo General Availability release, please refer to the release highlights.
This report indicates that ServiceNow Inc’s market share increased to around 0.79% due to a robust overall revenue growth of 20.12%.
How to Automate ServiceNow with Appium?
Before we move towards ServiceNow testing, it’s good to discuss the Application Under Test (AUT), the tools used, and the automation test strategy to define the scenarios for testing.
Application Under Test (ServiceNow Demo Application)
In this ServiceNow with Appium tutorial, ServiceNow’s mobile application is used for testing. It is available online and can be downloaded from the Google Play Store.
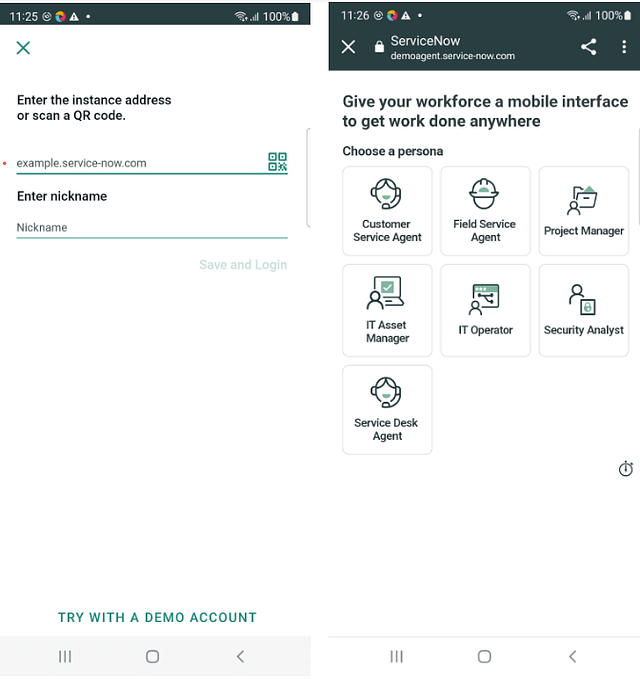
On clicking the “TRY WITH A DEMO ACCOUNT” link, the application will ask for a persona to choose, We will be choosing the “Service Desk Agent” option and accordingly will test the application further. Check out the Test Scenarios section below to learn more about the scenarios used for testing.
Getting Started with ServiceNow Testing
In this blog section on ServiceNow with Appium, let’s see how to get started with ServiceNow Testing.
Following tools/language has been used in writing and running the tests:
Programming Language: Java
Mobile App Automation Tool: Appium (Appium Java Client version 8.3.0)
Test Runner: TestNG
Build Tool: Maven
Cloud Platform to run the tests: LambdaTest
Test Scenarios
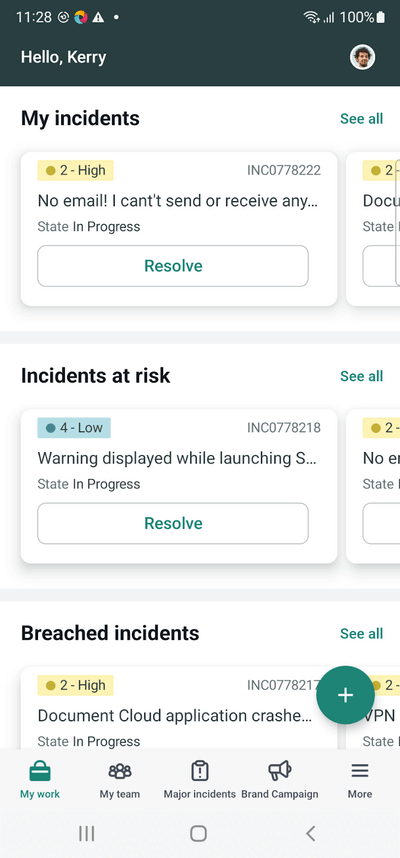
We will target the New Incident Creation screen and My Incidents page for test automation. However, before we move on to those screens, we need to launch the demo instance of the application and choose the Service Agent persona.
Test Scenario 1:
We will automate the following steps in the current test:
Launch the application, click on the “TRY WITH A DEMO ACCOUNT” link.
Choose Service Desk Agent persona and launch the demo app.
<project xmlns="http://maven.apache.org/POM/4.0.0" xmlns:xsi="http://www.w3.org/2001/XMLSchema-instance"
  xsi:schemaLocation="http://maven.apache.org/POM/4.0.0 http://maven.apache.org/xsd/maven-4.0.0.xsd">
  <modelVersion>4.0.0</modelVersion>

  <groupId>io.github.mfaisalkhatri</groupId>
  <artifactId>servicenow-appium-testing</artifactId>
  <version>1.0-SNAPSHOT</version>
  <packaging>jar</packaging>

  <name>servicenow-appium-testing</name>
  <url>http://maven.apache.org</url>

  <properties>
    <appium-java-client-version>8.3.0</appium-java-client-version>
    <testng-version>7.7.1</testng-version>
    <lombok-version>1.18.26</lombok-version>
    <maven.compiler.source>11</maven.compiler.source>
    <maven.compiler.target>11</maven.compiler.target>
    <project.build.sourceEncoding>UTF-8</project.build.sourceEncoding>
    <maven.compiler.version>3.10.1</maven.compiler.version>
    <surefire-version>3.0.0-M8</surefire-version>
    <java.release.version>11</java.release.version>
    <maven.source.encoding>UTF-8</maven.source.encoding>
    <suite-xml>testng.xml</suite-xml>
    <argLine>-Dfile.encoding=UTF-8 -Xdebug -Xnoagent</argLine>
  </properties>

  <dependencies>
    <!-- https://mvnrepository.com/artifact/org.testng/testng -->
    <dependency>
      <groupId>org.testng</groupId>
      <artifactId>testng</artifactId>
      <version>${testng-version}</version>
      <scope>test</scope>
    </dependency>
    <!-- https://mvnrepository.com/artifact/io.appium/java-client -->
    <dependency>
      <groupId>io.appium</groupId>
      <artifactId>java-client</artifactId>
      <version>${appium-java-client-version}</version>
    </dependency>
    <!-- https://mvnrepository.com/artifact/org.projectlombok/lombok -->
    <dependency>
      <groupId>org.projectlombok</groupId>
      <artifactId>lombok</artifactId>
      <version>${lombok-version}</version>
      <scope>provided</scope>
    </dependency>
  </dependencies>

  <build>
    <plugins>
      <plugin>
        <groupId>org.apache.maven.plugins</groupId>
        <artifactId>maven-compiler-plugin</artifactId>
        <version>${maven.compiler.version}</version>
        <configuration>
          <release>${java.release.version}</release>
          <encoding>${maven.source.encoding}</encoding>
          <forceJavacCompilerUse>true</forceJavacCompilerUse>
        </configuration>
      </plugin>
      <plugin>
        <groupId>org.apache.maven.plugins</groupId>
        <artifactId>maven-surefire-plugin</artifactId>
        <version>${surefire-version}</version>
        <executions>
          <execution>
            <goals>
              <goal>test</goal>
            </goals>
          </execution>
        </executions>
        <configuration>
          <useSystemClassLoader>false</useSystemClassLoader>
          <properties>
            <property>
              <name>usedefaultlisteners</name>
              <value>false</value>
            </property>
          </properties>
          <suiteXmlFiles>
            <suiteXmlFile>${suite-xml}</suiteXmlFile>
          </suiteXmlFiles>
          <argLine>${argLine}</argLine>
        </configuration>
      </plugin>
    </plugins>
  </build>

</project>
ServiceNow mobile application supports the latest two versions of Apple iOS and the latest four versions of Google Android.
In this ServiceNow with Appium blog, we will run the tests on LambdaTest Appium Grid on the Real Android device –Samsung Galaxy S21 5G with Android 12 version as it is the latest Android device and version as of now.
The first step is to create an AndroidDriverManager class, which will be used to start the Android driver to run the tests on Android devices.
@Builder
public class AndroidDriverManager {
    private static final ThreadLocal<AndroidDriver> DRIVER = new ThreadLocal<> ();
    public               Platform                   platform;
    public               String                     platformVersion;
    private              String                     buildName;
    private              String                     testName;

    private static final String LT_USERNAME   = System.getProperty ("LT_USERNAME");
    private static final String LT_ACCESS_KEY = System.getProperty ("LT_ACCESS_KEY");
    private static final String GRID_URL      = "@mobile-hub.lambdatest.com/wd/hub";
    private              String deviceName;
    private              String app;
    public AndroidDriverManager createAndroidDriver () {
        try {
            DRIVER.set (
                new AndroidDriver (new URL (format ("https://{0}:{1}{2}", LT_USERNAME, LT_ACCESS_KEY, GRID_URL)),
                    capabilities ()));
            setupDriverTimeouts ();

        } catch (MalformedURLException e) {
            throw new Error ("Error setting up android Driver", e);
        }
        return this;
    }

    public AndroidDriver getDriver () {
        return DRIVER.get ();
    }

    public void quitDriver () {
        if (null != getDriver ())
            getDriver ().quit ();
        DRIVER.remove ();
    }

    private void setupDriverTimeouts () {
        getDriver ().manage ()
            .timeouts ()
            .implicitlyWait (Duration.ofSeconds (30));
    }

    private DesiredCapabilities capabilities () {
        DesiredCapabilities capabilities = new DesiredCapabilities ();
        capabilities.setCapability ("lt:options", ltOptions ());
        return capabilities;
    }

    private HashMap<String, Object> ltOptions () {
        final HashMap<String, Object> ltOptions = new HashMap<> ();
        ltOptions.put (MobileCapabilityType.PLATFORM_NAME, platform);
        ltOptions.put (MobileCapabilityType.PLATFORM_VERSION, platformVersion);
        ltOptions.put (MobileCapabilityType.DEVICE_NAME, deviceName);
        ltOptions.put (MobileCapabilityType.APP, app);
        ltOptions.put (AndroidMobileCapabilityType.AUTO_GRANT_PERMISSIONS, true);
        ltOptions.put ("username", LT_USERNAME);
        ltOptions.put ("accessKey", LT_ACCESS_KEY);
        ltOptions.put ("build", buildName);
        ltOptions.put ("name", testName);
        ltOptions.put ("w3c", true);
        ltOptions.put ("isRealMobile", true);
        ltOptions.put ("network", true);
        ltOptions.put ("visual", true);
        ltOptions.put ("console", true);
        ltOptions.put ("devicelog", true);
        return ltOptions;
    }
}
This smoke testing tutorial covers what smoke testing is, its importance, benefits, and how to perform it with real-time examples.
Code Walkthrough
Static Variables in the DriverManager class
The use of ThreadLocal class in this context enables the safe setting of drivers, especially when running tests in parallel. This is because ThreadLocal provides thread safety and effectively isolates two threads, even if they set different values on the same ThreadLocal object. The primary advantage of using ThreadLocal is ensuring threads run independently and in isolation.
The following capabilities are necessary for running tests on the LambdaTest platform: GRID_URL, which must be configured, and LT_USERNAME and LT_ACCESS_KEY, which are required for authentication and creating new sessions. These capabilities can be set using the LambdaTest Capabilities Generator.
LambdaTest, a cloud-based testing platform, enables you to conduct comprehensive testing on a real device cloud consisting of over 3000 different devices and operating systems. This platform provides a cloud Appium Grid, which can be utilized to automate the testing of ServiceNow workflows, ensuring that your users receive a top-notch digital experience.
%[INVALID_URL]Subscribe to the LambdaTest YouTube Channel and stay updated with the latest tutorial around Selenium testing, Appium, Playwright automation testing, and more.
LambdaTest Capabilities Generator
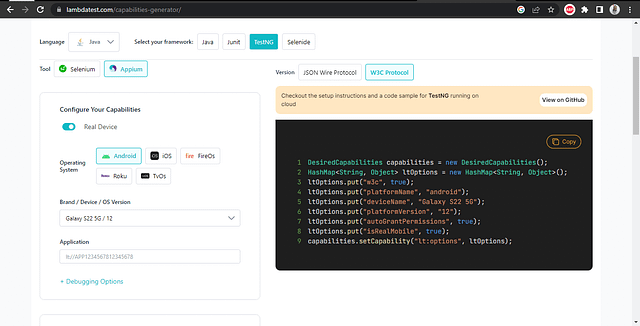
LambdaTest Capabilities Generator helps you set the capabilities by selecting the required configurations from the UI. Accordingly, it generates code that can be copy pasted easily into the project to start the mobile automation test hassle-free.
Setting the Desired Capabilities

Apart from the static variables, other variables are declared like platform, platform version, devicename, app, etc. The device will be assigned to run the test based on these configurations.
The code mentioned above utilizes the @Builder annotation from the Lombok library, which facilitates the runtime passing of variable values such as platform, platform name, device name, and app.
Check out the Base Test and the Test Execution section below, where the steps related to passing the values for these variables are discussed.
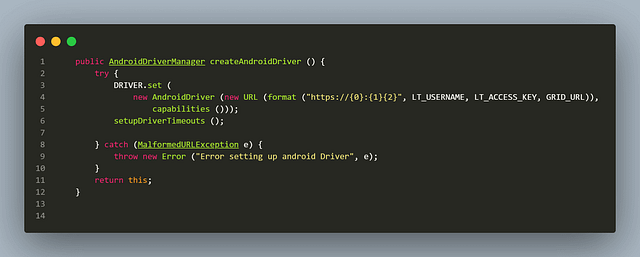
Setting up Android Driver to run tests on the cloud
The next important method to note is the createAndroidDriver(). This method sets up the Android driver in the LamdaTest, a ServiceNow cloud testing platform with the help of Desired Capabilities and runs the tests.
createAndroidDriver() method
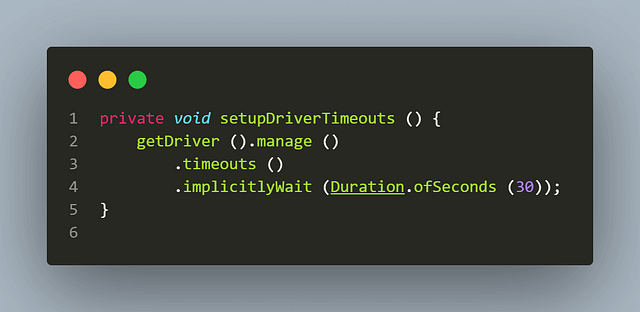
The setupBrowserTimeouts() method is called for setting the timeouts after the driver is set. The Implicit wait is added, so while searching for a single element, the driver should poll the page until an element is found or the timeout expires. This wait applies to all the elements on the Screen.
Likewise, Explicit wait can also be added for finding a specific element where we ask the driver instance to wait for a certain condition invoked through ExpectedConditions.
All our configurations are now set. Let’s now jump on to writing the automated tests.
How to write automated tests for the ServiceNow Demo Mobile application?
First, let’s write the base tests where the common configuration will be set up, like starting and quitting the Android driver.
This base test will be extended to the Test Class, where actual tests are implemented.
public class BaseTest {
    protected AndroidDriverManager androidDriverManager;

    @Parameters ({ "buildName", "testName", "app", "platformName", "platformVersion", "deviceName" })
    @BeforeClass (alwaysRun = true)
    public void setupTest (String buildName, String testName, String app, Platform platform, String platformVersion,
        String deviceName) {

        androidDriverManager = AndroidDriverManager.builder ()
            .buildName (buildName)
            .testName (testName)
            .app (app)
            .platform (platform)
            .platformVersion (platformVersion)
            .deviceName (deviceName)
            .build ()
            .createAndroidDriver ();
    }

    @AfterClass (alwaysRun = true)
    public void tearDown () {
        androidDriverManager.quitDriver ();
    }
}
The @Parameters annotation in TestNG enables the configuration of multiple parameters through testng.xml, obviating the need to modify the code repeatedly. Consequently, tests can be executed on various devices, platforms, and specific platform versions without any code modification. The corresponding settings for platforms, platform versions, devices, apps, etc., can be updated in the testng.xml, and the tests can be executed accordingly.
Implementation of Test Scenarios
Here is the test that covers all three scenarios discussed in the test automation strategy in the earlier section of this blog on ServiceNow with Appium.
public class ServiceNowAppTests extends BaseTest {
@BeforeClass
public void launchApp () {
LaunchPage launchPage = new LaunchPage (androidDriverManager);
launchPage.launchDemoApp ();
}
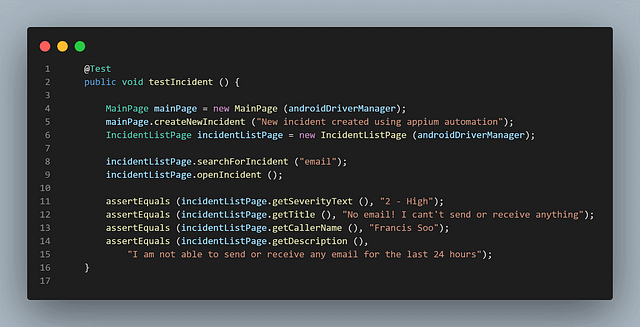
@Test
public void testIncident () {
MainPage mainPage = new MainPage (androidDriverManager);
mainPage.createNewIncident ("New incident created using appium automation");
IncidentListPage incidentListPage = new IncidentListPage (androidDriverManager);
incidentListPage.searchForIncident ("email");
incidentListPage.openIncident ();
assertEquals (incidentListPage.getSeverityText (), "2 - High");
assertEquals (incidentListPage.getTitle (), "No email! I cant't send or receive anything");
assertEquals (incidentListPage.getCallerName (), "Francis Soo");
assertEquals (incidentListPage.getDescription (),
"I am not able to send or receive any email for the last 24 hours");
}
}
A comprehensive Exploratory Testing tutorial that covers what Exploratory Testing is, its importance, benefits, and how to perform it with real-time examples.
While writing tests, the Page Object Model is adhered to, which involves creating four separate Page Object classes for the four pages that require testing: Launch Page, Main Page, New Incident Page, and Incident List Page.
Implementation (Test Scenario 1)
As discussed in the automation testing strategy, let’s implement the first scenario where a demo instance of the application will be launched, and the Service Agent persona will be selected.
The LaunchPage class has all the locators for the Launch Screen, which has fields like the Demo link, Service Desk Agent option, and Launch Demo button.
public class LaunchPage {
private final AndroidDriverManager androidDriverManager;
private final WebDriverWait wait;
public LaunchPage (final AndroidDriverManager androidDriverManager) {
this.androidDriverManager = androidDriverManager;
wait = new WebDriverWait (androidDriverManager.getDriver (), Duration.ofSeconds (30));
}
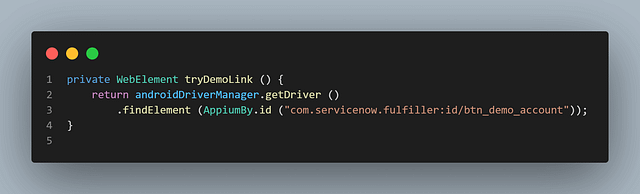
private WebElement tryDemoLink () {
return androidDriverManager.getDriver ()
.findElement (AppiumBy.id ("com.servicenow.fulfiller:id/btn_demo_account"));
}
private void clickOnTryDemoLink () {
tryDemoLink ().click ();
}
private WebElement serviceDeskOptionMenu () {
return wait.until (ExpectedConditions.elementToBeClickable (By.id ("itsm")));
}
private void clickServiceDeskAgentOption () {
switchToWebViewContext ();
serviceDeskOptionMenu ().click ();
}
private WebElement launchDemoBtn () {
return androidDriverManager.getDriver ()
.findElement (By.id ("launchDemo"));
}
private void clickLaunchDemoBtn () {
launchDemoBtn ().click ();
switchToNativeAPP ();
}
private void switchToWebViewContext () {
wait.until (d -> androidDriverManager.getDriver ()
.getContextHandles ()
.size () > 1);
androidDriverManager.getDriver ()
.context ("WEBVIEW_chrome");
}
private void switchToNativeAPP () {
androidDriverManager.getDriver ()
.context ("NATIVE_APP");
}
public void launchDemoApp () {
clickOnTryDemoLink ();
clickServiceDeskAgentOption ();
clickLaunchDemoBtn ();
}
}
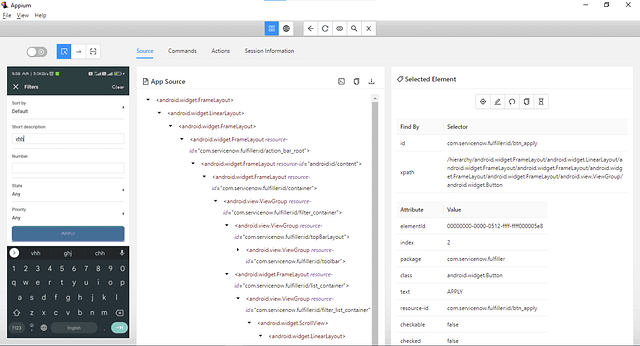
To locate the elements, the Appium Inspector application is used, which helps us easily to locate all the elements.
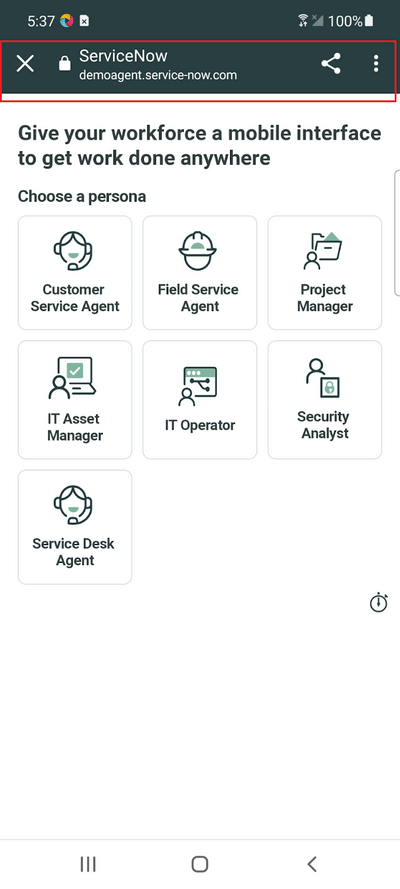
After opening Appium Inspector with all the required desired capabilities, locate the “TRY WITH DEMO ACCOUNT” link. We must locate and interact with this first element to start the demo application.
Locating the “TRY WITH A DEMO ACCOUNT” link
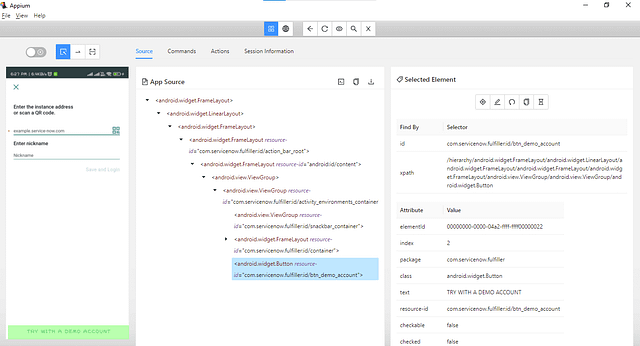
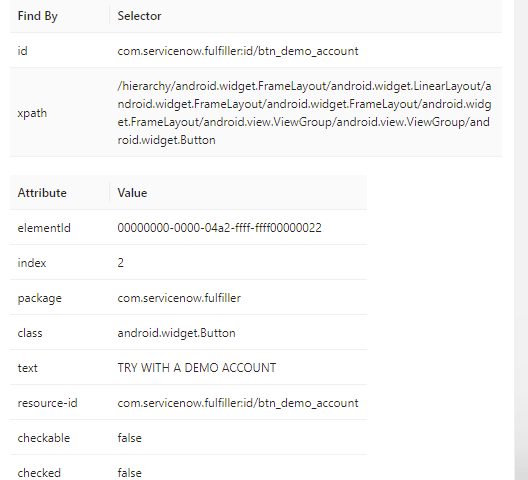
Appium Inspector shows that the link can be located using the id locator.
Here is the code to locate the element.
Let’s now locate the Service Desk Agent persona option and continue further to launch the demo app.
Locating the Service Desk Agent Persona option
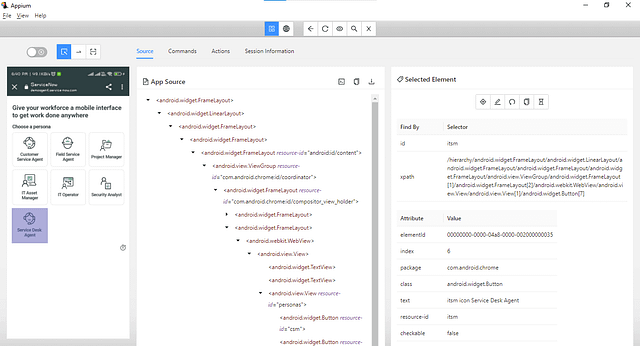
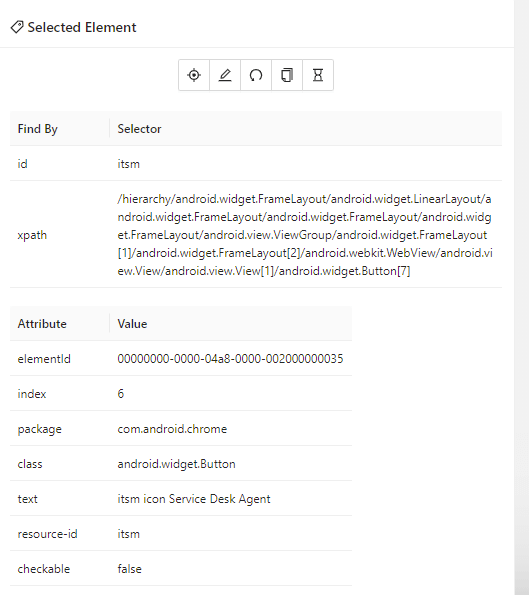
If you notice the Application screen, this page runs inside WebView using Chrome. We can verify the different contexts in which the application runs using the Commands tab in Appium Inspector.
Checking Context using Appium Inspector
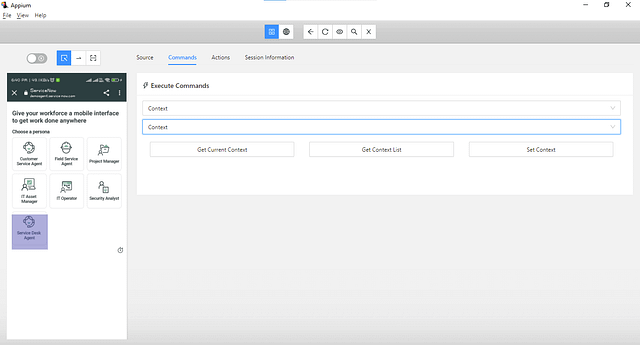
Select the Context in the first and the second dropdown boxes and click the Get Context List button. It will show all the available contexts for the application.
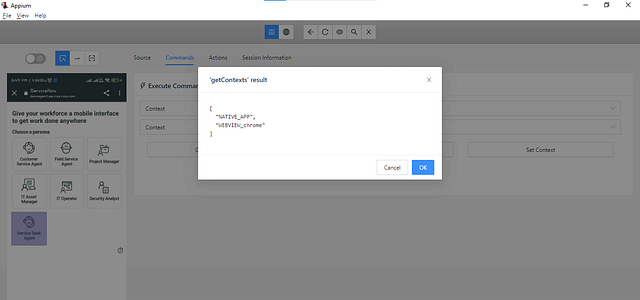
In WebView, we can see that the context is “WEBVIEW_chrome,” which we will be using to switch context so the elements on this page can be located. The elements will not be located until the context is switched, and Appium will throw NoSuchElementException.
Which are the most wanted test automation tools that have climbed the top of the ladder so far? Let’s take a look.
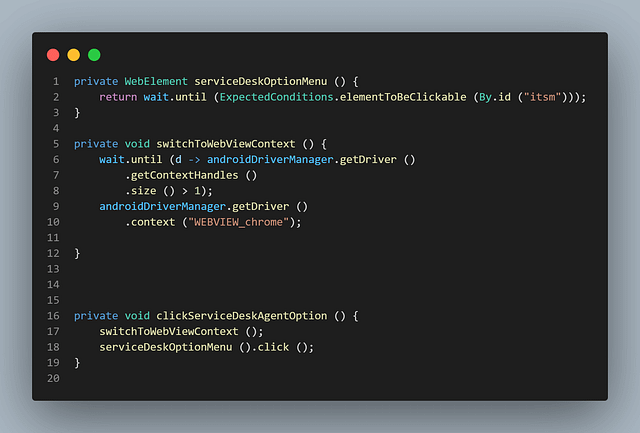
The serviceDeskOptionMenu() method locates the element for the Service Desk Agent option.switchToWebViewContext() method helps in switching to WebView context.
To click on the Service Desk Agent option, first, we need to switch to WebView, locate the Service Desk Agent option, and click on it.
The clickServiceDeskAgentOption() method performs the mentioned steps.
Next, we will locate the Launch Demo button.
Locating the Launch Demo button
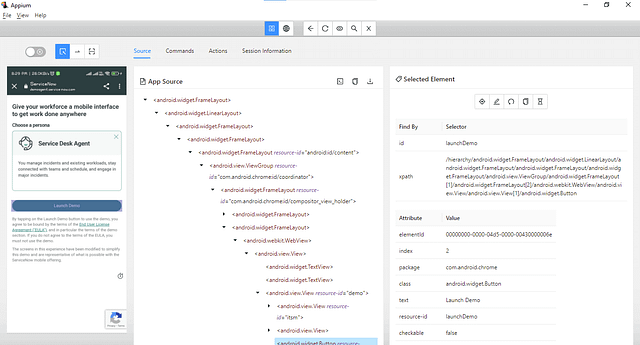
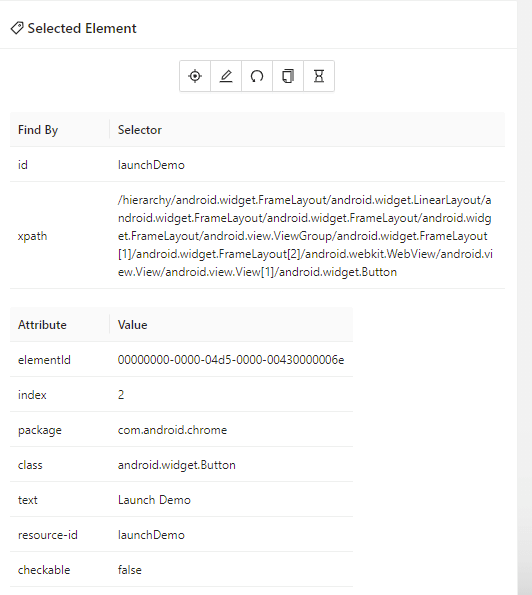
The Launch Demo button can be located using the id locator. The following code will help in locating the Launch Demo button and clicking on it.
Next, we must switch back to the Native App context to move the focus back to the application.
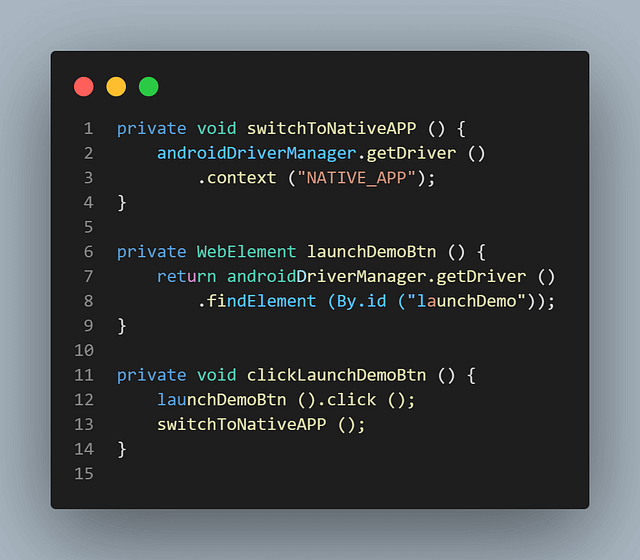
The launchDemoBtn() method returns the locator for Launch Demo button and clickLaunchDemoBtn() will click on the button and switch to NATIVE_APP context.
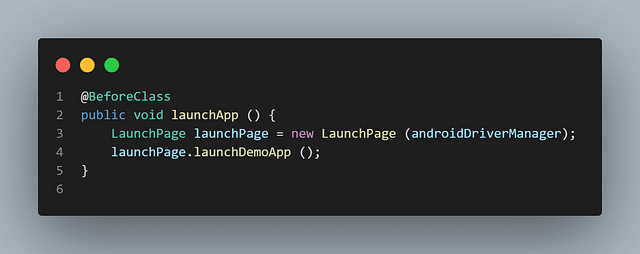
Here is the launchApp() method, which runs before the test and launches the app with a Service Desk Agent instance demo. This method has the TestNG’s @BeforeClass annotation. @BeforeClass annotated method runs before the first test method in the current class is invoked. Hence, this method will be invoked before any test is run and will help to start the application under test successfully, so all our tests run smoothly.
Implementation (Test Scenario 2)
In Scenario 2, we discussed creating a new Incident by clicking on the “+” button on the Main Page.
Here is the implementation code for the test:
 @Test
    public void testIncident () {

        MainPage mainPage = new MainPage (androidDriverManager);
        mainPage.createNewIncident ("New incident created using appium automation");
        IncidentListPage incidentListPage = new IncidentListPage (androidDriverManager);

        incidentListPage.searchForIncident ("email");
        incidentListPage.openIncident ();

        assertEquals (incidentListPage.getSeverityText (), "2 - High");
        assertEquals (incidentListPage.getTitle (), "No email! I cant't send or receive anything");
        assertEquals (incidentListPage.getCallerName (), "Francis Soo");
        assertEquals (incidentListPage.getDescription (),
            "I am not able to send or receive any email for the last 24 hours");
}
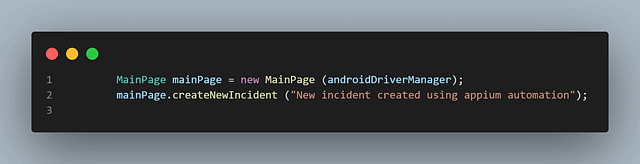
The following lines in the above method is used for creating a new incident:
The NewIncidentPage class has been created to locate all the elements required for creating a new incident.
public class NewIncidentPage {

    private final AndroidDriverManager androidDriverManager;
    private final WebDriverWait        wait;

    public NewIncidentPage (final AndroidDriverManager androidDriverManager) {
        this.androidDriverManager = androidDriverManager;
        this.wait = new WebDriverWait (androidDriverManager.getDriver (), Duration.ofSeconds (30));

    }

    private WebElement callerField () {
        return androidDriverManager.getDriver ()
            .findElement (AppiumBy.id ("com.servicenow.fulfiller:id/valueLayout"));
    }

    private void selectCallerName () {
        callerField ().click ();
        wait.until (ExpectedConditions.elementToBeClickable (AppiumBy.accessibilityId ("Abraham Lincoln")))
            .click ();

    }

    public void setCallerName () {
        selectCallerName ();
    }

    private WebElement shortDescriptionField () {
        return androidDriverManager.getDriver ()
            .findElement (AppiumBy.accessibilityId ("Short description"));
    }

    public void enterShortDescription (String shortDesc) {
        shortDescriptionField ().sendKeys (shortDesc);
    }

    private WebElement submitBtn () {
        return androidDriverManager.getDriver ()
            .findElement (AppiumBy.accessibilityId ("Submit"));
    }

    public void clickSubmitBtn () {
        submitBtn ().click ();
    }
}
This page is self-explanatory as it locates the web elements on the New Incident screen and performs actions on it. However, before we come to this screen, there is a Main screen where we select the Create New Incident option. The MainPage class helps to locate the “create a new incident” link and perform a click action on it.
public class MainPage {
private final AndroidDriverManager androidDriverManager;
public MainPage (final AndroidDriverManager androidDriverManager) {
this.androidDriverManager = androidDriverManager;
}
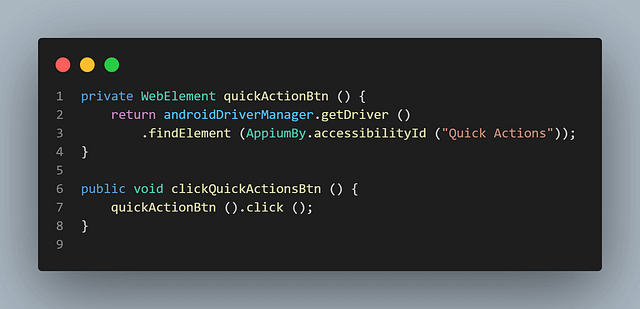
private WebElement quickActionBtn () {
return androidDriverManager.getDriver ()
.findElement (AppiumBy.accessibilityId ("Quick Actions"));
}
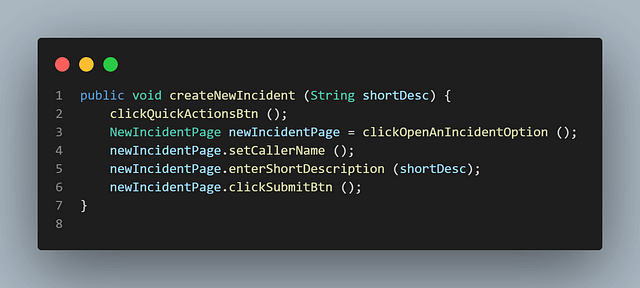
The createNewIncident() method is the main method, which takes care of all the steps required to create a new incident. It accepts a parameter called short description, a mandatory field for creating an incident. This parameter is kept so any text can be supplied from the tests for setting “short description” while creating a new incident.
Test your native, hybrid, and web apps across all legacy and latest mobile operating systems on the most powerful Android emulator online.
For creating a new incident following steps needs to be taken care of:
Click on the Quick Actions button — This is done using the clickQuickActionsBtn() method.
Locating Quick Actions Button
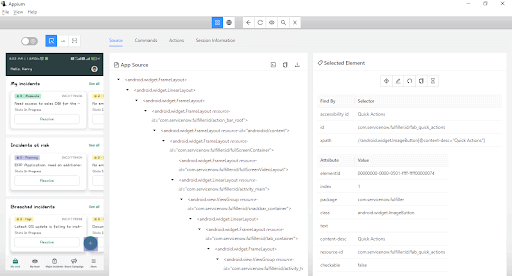
The Quick Actions button can be located using the accessibility id “Quick Actions.”
Accessibility ID is the most preferred locator strategy in Appium. For Android, it is the content-desc property of the element, while for iOS, it’s the accessibility-id property. It is also one of the fastest-performing locator strategies.
clickQuickActionsBtn() method
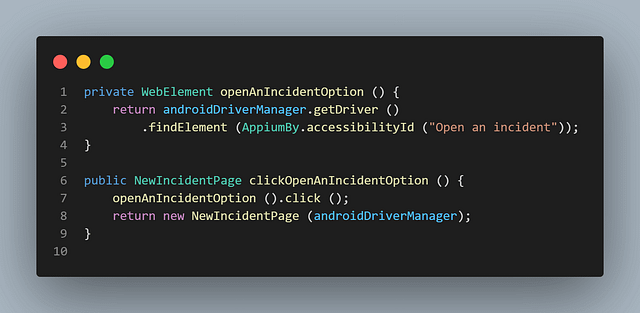
Click the Open an incident option. This is done using the clickOpenAnIncidentOption() method, which returns a new instance of the NewIncidentPage class.
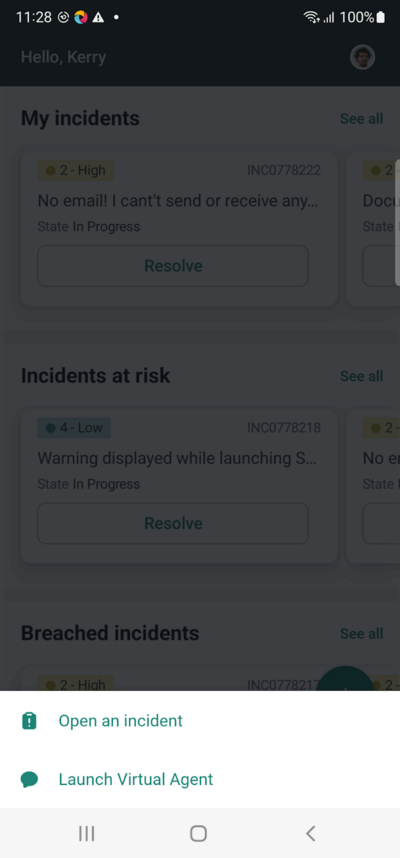
Locating Open an incident link

The “Open an incident” link can be located using the accessibility id -”Open an incident”.
clickOpenAnIncidentOption() method
Select the Caller Name and Short Description to create a new incident — this is done using the selectCallerName() method and enterShortDescription() methods, respectively.
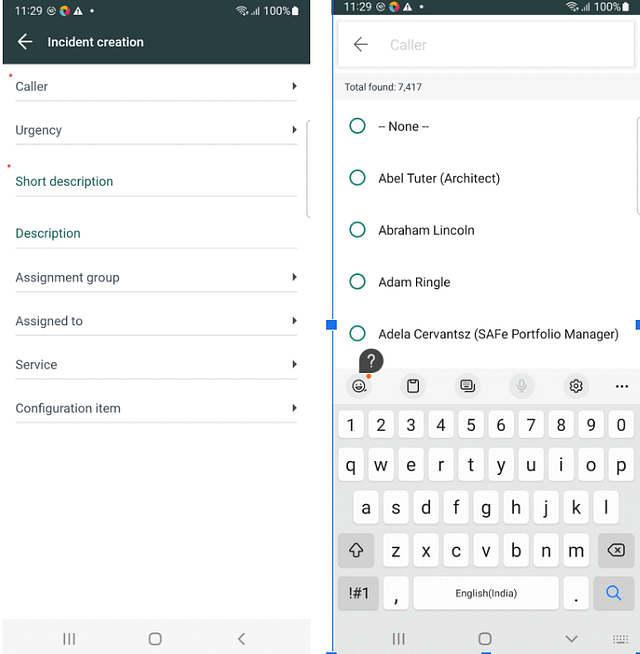
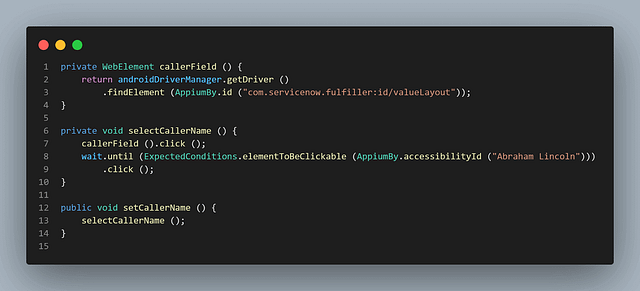
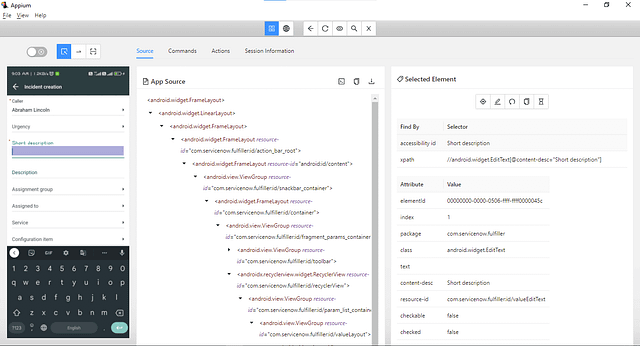
Locating Caller Field and Caller Name
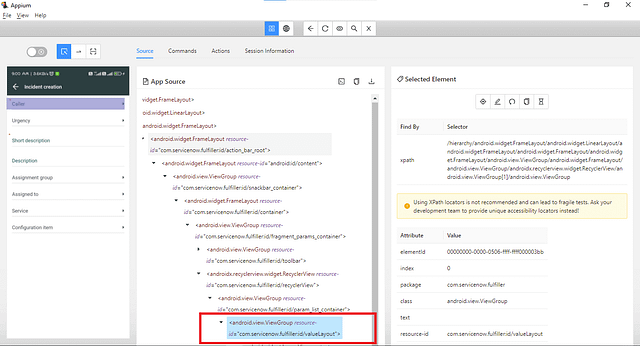
Though the id locator for the callerField is not listed in the Selected Element part of the screen. However, in the DOM, we can see that there is an id corresponding to the field
Let’s make use of this id locator to locate the field.
Locating the Caller Name
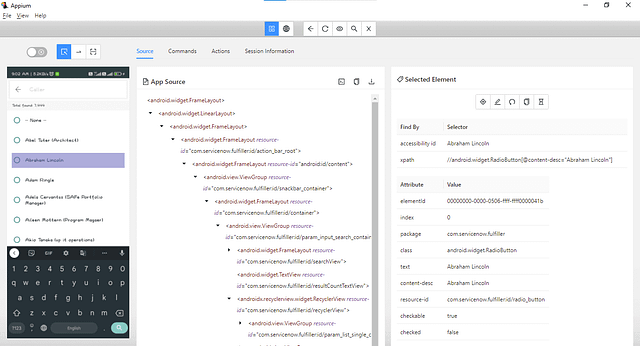
Here, accessibility id “Abraham Lincoln” can be used to locate the caller name. Here is the code implementation to select caller name
Caller field() and selectCallerName() method
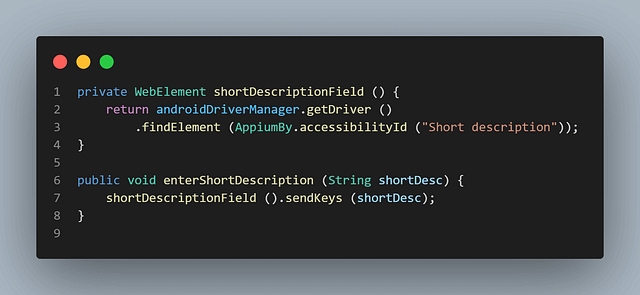
Locating Short Description field
Accessibility id — Short description can be used to locate this field.
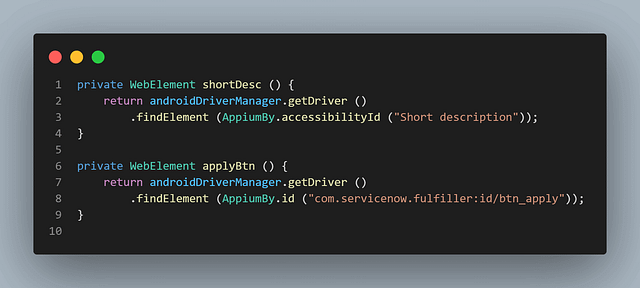
enterShortDescription() method
As soon as we type the Short Description in the field, the Submit button gets displayed on the screen. On clicking it, we can successfully create a new incident.
Locating Submit button
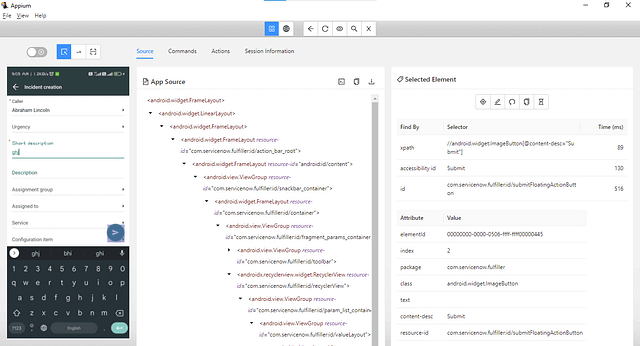
Let’s use the Accessibility id — Submit to locate the button.
clickSubmitBtn() method
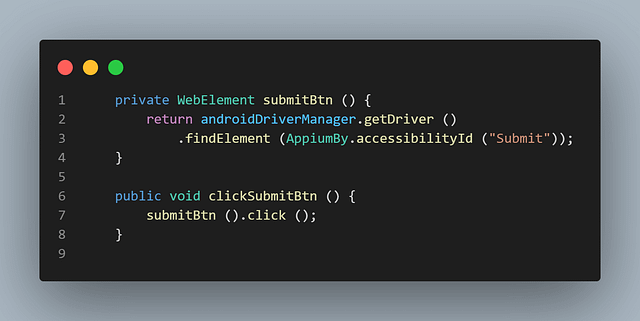
The clickSubmitBtn() method is created, which clicks on the Submit button to create a new incident.
Implementation (Test Scenario 3)
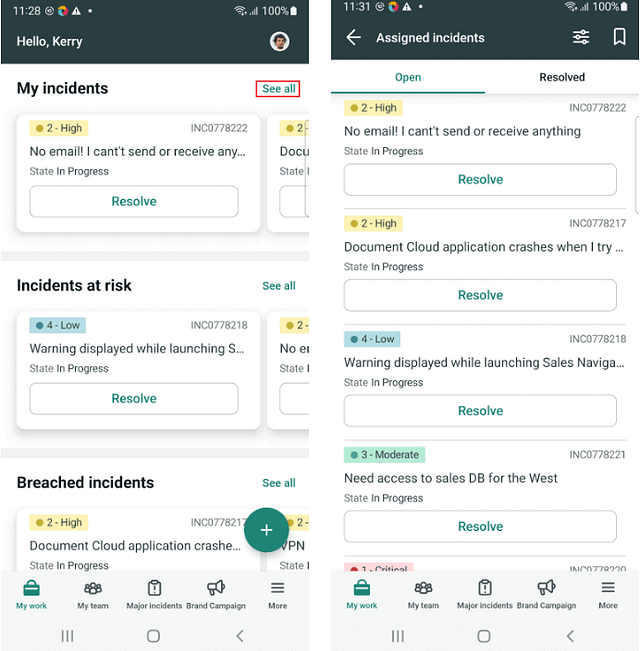
In this scenario, as discussed in the test strategy, we will navigate to the My All Incidents page, filter the incidents based on the short description, and verify the contents of the incident.
Here is the implementation code for the test:
testIncident() Test
The IncidentListPage class is created to locate elements on this page.
public class IncidentListPage {
private final AndroidDriverManager androidDriverManager;
private final WebDriverWait wait;
public IncidentListPage (final AndroidDriverManager androidDriverManager) {
this.androidDriverManager = androidDriverManager;
this.wait = new WebDriverWait (androidDriverManager.getDriver (), Duration.ofSeconds (30));
}
private WebElement seeAllLink () {
return wait.until (
ExpectedConditions.visibilityOfElementLocated (AppiumBy.accessibilityId ("My incidents See all")));
}
private WebElement filterBtn () {
return androidDriverManager.getDriver ()
.findElement (AppiumBy.accessibilityId ("Filter button off"));
}
private WebElement shortDesc () {
return androidDriverManager.getDriver ()
.findElement (AppiumBy.accessibilityId ("Short description"));
}
private WebElement applyBtn () {
return androidDriverManager.getDriver ()
.findElement (AppiumBy.id ("com.servicenow.fulfiller:id/btn_apply"));
}
public void searchForIncident (String searchDesc) {
seeAllLink ().click ();
filterBtn ().click ();
shortDesc ().click ();
shortDesc ().sendKeys (searchDesc);
applyBtn ().click ();
}
public void openIncident () {
androidDriverManager.getDriver ()
.findElement (AppiumBy.accessibilityId ("2 - High"))
.click ();
}
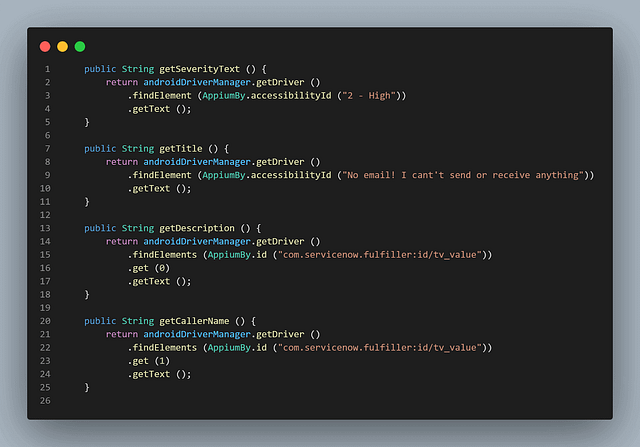
public String getSeverityText () {
return androidDriverManager.getDriver ()
.findElement (AppiumBy.accessibilityId ("2 - High"))
.getText ();
}
public String getTitle () {
return androidDriverManager.getDriver ()
.findElement (AppiumBy.accessibilityId ("No email! I cant't send or receive anything"))
.getText ();
}
public String getDescription () {
return androidDriverManager.getDriver ()
.findElements (AppiumBy.id ("com.servicenow.fulfiller:id/tv_value"))
.get (0)
.getText ();
}
public String getCallerName () {
return androidDriverManager.getDriver ()
.findElements (AppiumBy.id ("com.servicenow.fulfiller:id/tv_value"))
.get (1)
.getText ();
}
}
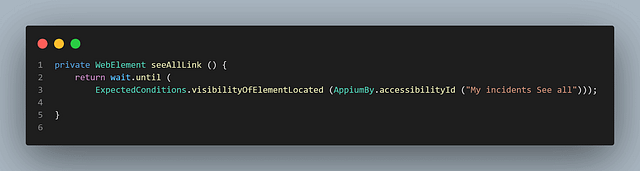
The searchForIncident() method is created to search for an incident based on the text supplied in its method parameter. This method performs the steps to click on the “See All” link using the seeAll link() method, which returns the WebElement for the link.
Locating the seeAll link
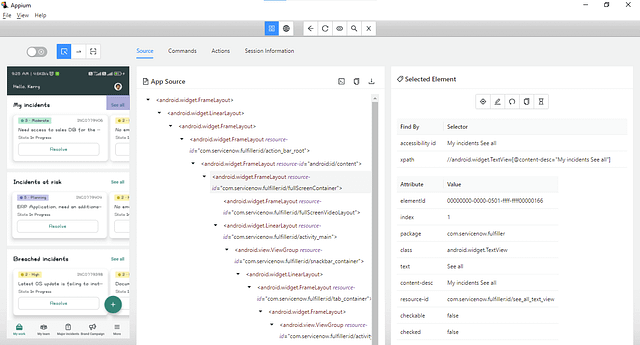
Accessibility id — “My incident See All” is available to locate the “See All” link.
seeAllLink() method
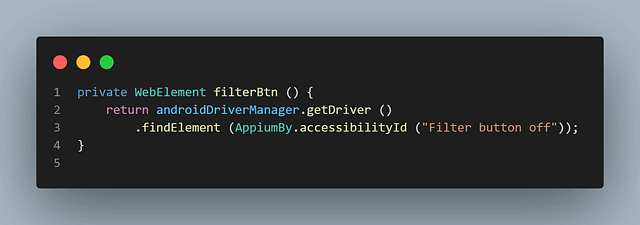
Next, the Filter button is clicked using the filterBtn() method, which returns the WebElement for the filter button.
Locating the Filter button

Accessibility id — “Filter button off” can be used to locate the filter button.
filterBtn() method
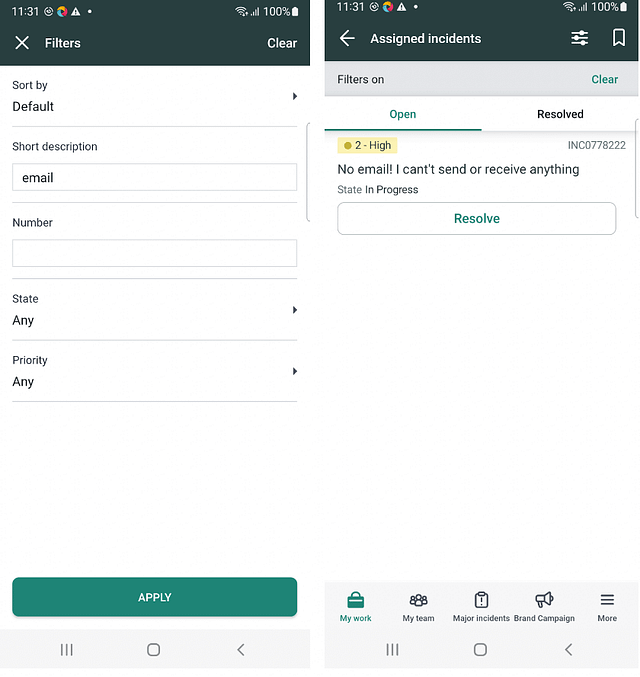
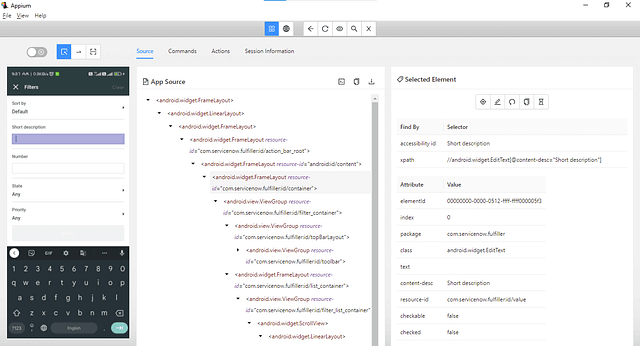
Next, we locate the Short Description field to enter the respective value in it to create a new incident.
This field can be located using the Accessibility id- Short description.
Locating the short description field
Once the short description is entered, the Apply button is displayed, clicking on it, the incidents with mentioned short description will be fetched.
Locating the Apply button
shortDesc() and applyBtn() methods
Once the record is retrieved, we need to get the texts from the fields like Caller Name, Title, Description, Severity, etc. The following methods will help us in getting all the required texts
Here is the code from the tests, which will perform all the required assertions
IncidentList page assertions
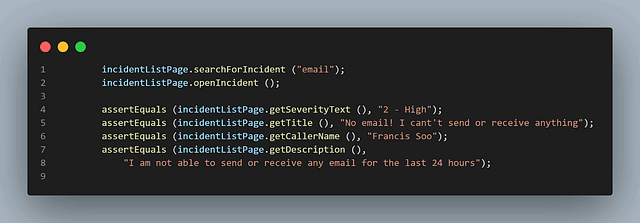
With the assertions, we have completed our tests and covered all the scenarios we discussed as per test automation strategy.
Let’s now run the tests and check the result.
Test Execution
From the IDE using TestNG.
Using Maven.
Using TestNG
TestNG is used as a test runner; hence testng.xml has been created. Tests can be run by right-clicking on the file and selecting Run ‘…\testng.xml’. As discussed earlier, we are running the tests on Android platform Version 11 and 12 respectively with devices Samsung Galaxy Note 20 and Samsung Galaxy S21 5G. All these configurations are set using the testng.xml file.
<?xml version="1.0" encoding="UTF-8"?>
<!DOCTYPE suite SYSTEM "http://testng.org/testng-1.0.dtd">
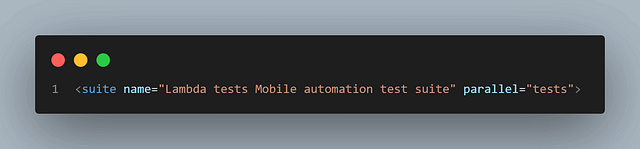
<suite name="Lambda tests Mobile automation test suite" parallel="tests">
<test name="ServiceNow app - Android Mobile Automation">
<parameter name="buildName" value="Android Automation with ServiceNow app"/>
<parameter name="testName" value="ServiceNow App Tests"/>
<parameter name="app" value="lt://APP10160531401676375222905553"/>
<parameter name="platformName" value="ANDROID"/>
<parameter name="platformVersion" value="11"/>
<parameter name="deviceName" value="Galaxy Note20"/>
<classes>
<class name="io.github.mfaisalkhatri.tests.ServiceNowAppTests">
<methods>
<include name="testLaunchDemoApp"/>
<include name="testIncident"/>
</methods>
</class>
</classes>
</test> <!-- Test -->
<test name="ServiceNow app - Android Mobile Automation">
<parameter name="buildName" value="Android Automation with ServiceNow app"/>
<parameter name="testName" value="ServiceNow App Tests"/>
<parameter name="app" value="lt://APP10160531401676375222905553"/>
<parameter name="platformName" value="ANDROID"/>
<parameter name="platformVersion" value="12"/>
<parameter name="deviceName" value="Galaxy S21 5G"/>
<classes>
<class name="io.github.mfaisalkhatri.tests.ServiceNowAppTests">
<methods>
<include name="testLaunchDemoApp"/>
<include name="testIncident"/>
</methods>
</class>
</classes>
</test> <!-- Test -->
</suite> <!-- Suite -->
The following four values need to be supplied as per the Test Configurations otherwise the tests won’t run:
LambdaTest Username
LambdaTest Access Key
These values can be passed as “-DLT_USERNAME= -DLT_ACCESS_KEY=”
Screenshot of the test run locally using IntelliJ IDE
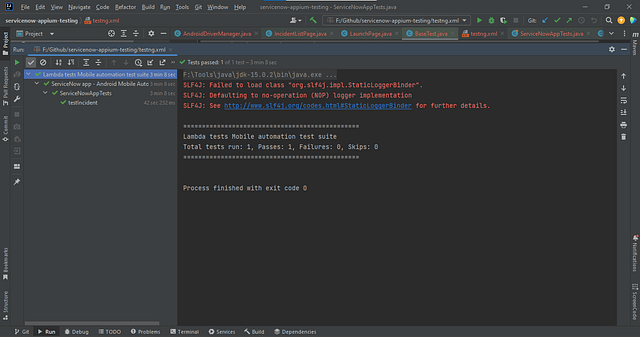
Parallel Execution of the Tests:
The recently performed tests with TestNG were executed concurrently, which means that all the tests were run simultaneously. In contrast, in sequential execution, we need to wait for one test to finish before the next one can begin. Parallel execution is a time-saving approach for test execution because all tests are performed concurrently.
For performing parallel testing in TestNG, we need to mention parallel=”tests” in testng.xml. Here, all the test blocks updated in testng.xml will be executed in parallel.
Since we’ve incorporated the ThreadLocal class into our code, our execution is now thread-safe. Consequently, there’s no need to be concerned about issues like overlapping test sessions.
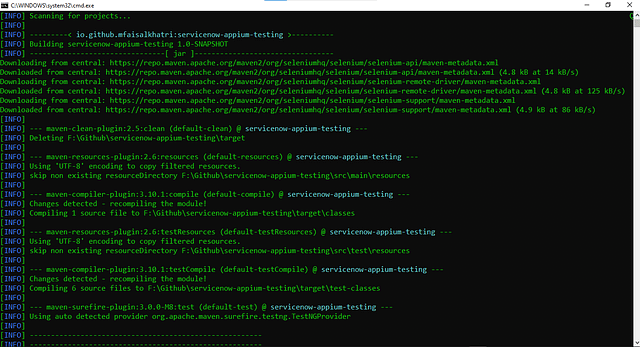
Using Maven
To run the tests using Maven, the following steps need to be run:
From Command Line:
Open command Prompt/Terminal.
Navigate to the root folder of the project.
Type the command on the terminal:
mvn clean test -DLT_USERNAME=< LambdaTest Username > -DLT_ACCESS_KEY=< LambdaTest Access Key >
Screenshot of the test results run using Maven
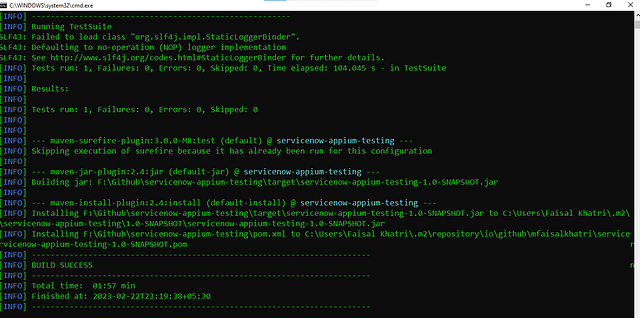
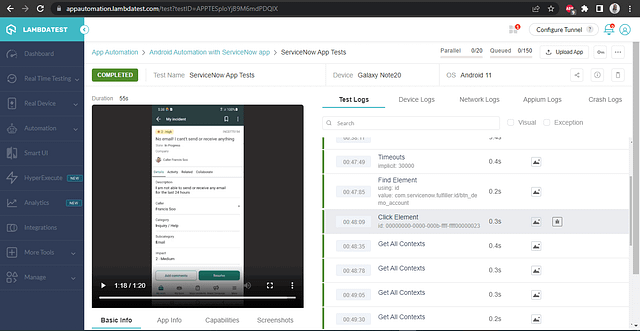
Once the tests are run successfully, we can check out the LambdaTest Dashboard and view all the video recordings, screenshots, device logs, and step-by-step granular details of the test run in the LambdaTest Analytics.
Check out the screenshots below, which will give you a fair idea of the dashboard for automated app tests.
LambdaTest Dashboard
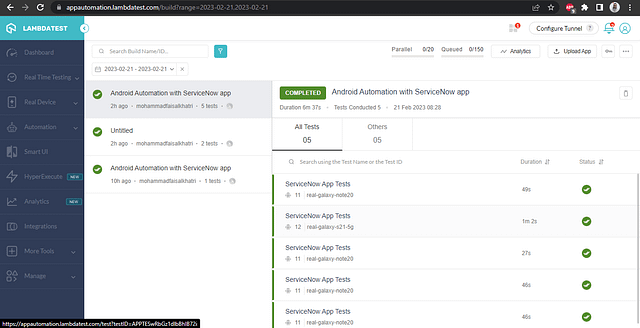
The details of the build and the tests that were conducted are visible in the following screenshots. Each test includes the test name, browser name, browser version, OS name, respective OS version, and screen resolution, all of which are correctly displayed.
It also has the video of the test that was run, giving a better idea about how tests were run on the device.
LambdaTest Build Details
Details with Appium logs
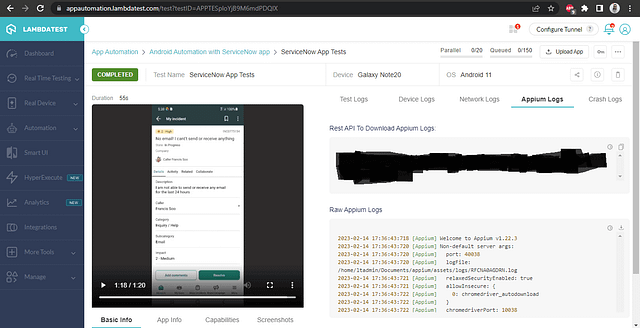
Test Execution on Samsung Note 20:
%[INVALID_URL]Test Execution on Samsung Galaxy S21 5G:
%[INVALID_URL]Conclusion
In this ServiceNow with Appium tutorial, we discussed ServiceNow and its related mobile application and how it is useful in the digitization process.
We automated the ServiceNow mobile application using Service Desk Agent’s persona using Appium by running the tests on the LambdaTest Cloud platform’s Real Android Device. If you liked this blog, don’t forget to share it with your network, who may also benefit from it and help them learn.


