Table of contents
- What is the React Native framework?
- How to test React Native apps?
- What is Appium?
- How to write tests for React Native apps using Appium?
- What is Appium Inspector?
- What is Appium Server?
- Writing React Native app tests for Android and iOS
- How to test React Native apps on iOS and Android using Appium?
- Getting Started
- Automation Tests
- Page Object Model
- Platforms considered for running the tests
- Base Test
- Setting up the Tests
- How to test React Native apps on iOS and Android using testng.xml?
- Conclusion
As everyone knows, the mobile industry has taken over the world and is the fastest emerging industry in terms of technology and business. It is possible to do all the tasks using a mobile phone, for which earlier we had to use a computer. According to Statista, in 2021, smartphone vendors sold around 1.43 billion smartphones worldwide. The smartphone penetration rate has been continuously rising, reaching 78.05 percent in 2020. By 2025, it is expected that almost 87 percent of all mobile users in the United States will own a smartphone.

With the technology emerging so fast, mobile apps have captured most of the industry market. Every organization is focused on creating a new app for their business platform, and the React Native framework is in trend for creating mobile apps as it has some cool features. Some examples of React Native apps are Facebook, Instagram, Discord, Flipkart, Oculus, etc.
This mobile testing with Appium tutorial will cover some of the fundamentals of the React Native framework and its features. We will also see how to test React Native apps on iOS and Android devices.
So, let’s get started!
Are you using Playwright for automation testing? Run your Playwright test scripts instantly on 50+ browser/OS combinations using the LambdaTest cloud. Sign up for free!
What is the React Native framework?
React Native is a JavaScript-based framework for writing native mobile applications for iOS and Android platforms. It has the potential to expand to devices like AR, VR, Oculus, etc.
Being open-sourced, it has attracted many businesses as they don’t have to pay anything and can use it and upgrade for free.
Following are some of the essential features of React Native framework:
Open Source.
Huge Community Support.
Backed by Facebook.
Maximum Code reuse, which helps in saving cost and time.
Good Performance for Mobile apps.
With 22.2k Fork and 104k Stars on GitHub, and the weekly downloads stats, you can gauge the popularity of the React Native framework.
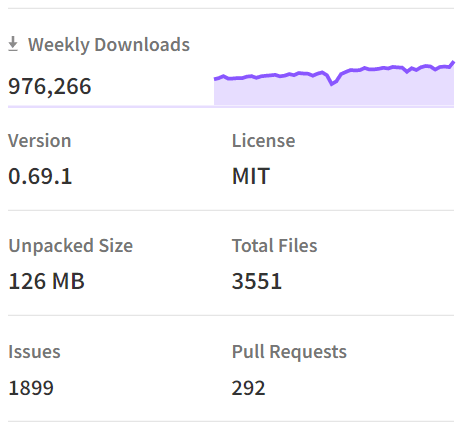
There are a lot more features of the framework. However, a few important ones are only discussed here. Creating mobile apps is important from a business point of view; however, testing mobile apps is equally important, so we don’t release any buggy apps to the end-users.
Mobile apps play a crucial role in today’s business; hence mobile app quality should be considered a key aspect while testing the apps. Having said that, we need to check all the possible permutations and combinations, so we do not let any loopholes open while performing React testing.
Functional and various non-functional testing like performance and security is also important while performing mobile app testing.
This Playwright tutorial will guide you through the setup of the Playwright automation framework, which will enable you to write end-to-end tests for your future projects.
How to test React Native apps?
In this section of this article on how to test React Native Apps on iOS and Android, we will be discussing different ways to test mobile apps. There are two approaches to testing a mobile app:
Manual Testing
Automated testing
Manual testing: Testing mobile apps manually is easy, but it’s time-consuming and requires lots of effort and repeated tasks to be performed every time a build is ready for testing. For every build, we would require functional validation, UI/UX checks, and regression testing of the earlier built code. However, you can always have a mobile app testing checklist for quick and better results.
Hence, it is recommended to have the manual exploratory checks in the end just to perform sanity of the feature that is well developed once all the automated checks pass.
Automated Testing: Mobile automation testing, on the other hand, is the perfect solution for today’s world. It saves time and cost. App test automation can also serve as documentation for your test cases and scenarios. Write it once and run it multiple times.
In this article on how to test React Native apps on iOS and Android, let us discuss and demonstrate how to test the React Native apps. Since React Native supports both iOS and Android platforms, testing on both platforms will be covered in this blog.
We would be using the Appium framework to write the tests and real devices to perform Appium mobile testing on the LambdaTest cloud platform.
Get started with the Playwright automation testing Framework with the help of this Playwright tutorial.
What is Appium?
Appium is a popular open-source mobile testing framework that helps automate the tests for iOS, Android, and Windows platforms. It can be used to test native, mobile, web, and hybrid apps. You can learn more about it from our earlier blog on web vs hybrid vs native apps.
It supports the React Native apps out of the box and runs the test cases using the WebDriver interface. It also supports multiple programming languages like Java, Javascript, C#, Python, PHP, and Ruby.
Appium allows the user to run the tests on real device cloud as well as on emulators and simulators. You can check our earlier blog on emulator-vs-simulator-vs-real-device to choose the right one for yourself.
Appium internally has the support for UiAutomator2 and Espresso automation testing for Android apps. Likewise, it has support for the XCUITest automation testing for iOS apps.
How to write tests for React Native apps using Appium?
Let me tell you about the Android and iOS apps we will use to write the tests. These are demo apps built by LambdaTest. Cloud-based Appium automation grids such as LambdaTest allow you to perform cross browser testing on an online device farm of over 3000+ real devices and operating systems. Here’s a short glimpse of the native app testing feature using real devices on the LambdaTest platform:
Proverbial App on Android
Proverbial App on iOS
Before we start writing the test, it is necessary that we find the locators of the element so it would be easy for us to navigate through the tests.
We would need Appium Inspector and Appium Desktop in the local machine to locate the elements.
A comprehensive UI Testing tutorial that covers what UI testing is, its importance, benefits, and how to perform it with real-time examples.
What is Appium Inspector?
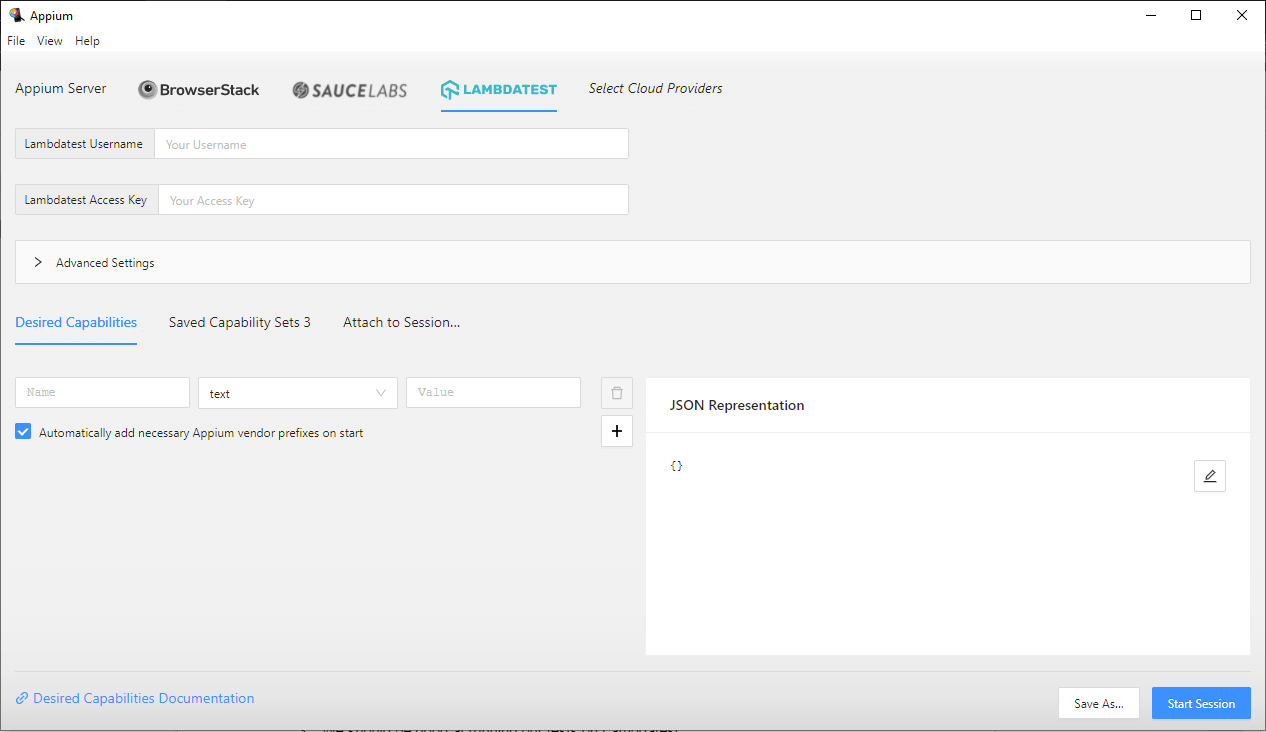
Appium-inspector is a GUI-based mobile element locating tool handy for automation guys. This tool makes the life of an automation test engineer much easier by helping locate the elements quickly which would be used in test automation.
Steps to Install Appium Inspector:
Navigate to the Appium-inspector download page.
Download the binary as per your Operating System. So if you are on macOS, download the file with extension *.dmg. If you are a Windows user, download the *.exe file.
Once the respective file is downloaded, double-click on it to run and follow the steps as guided by the application. You should be able to install the Appium Inspector app successfully.
What is Appium Server?
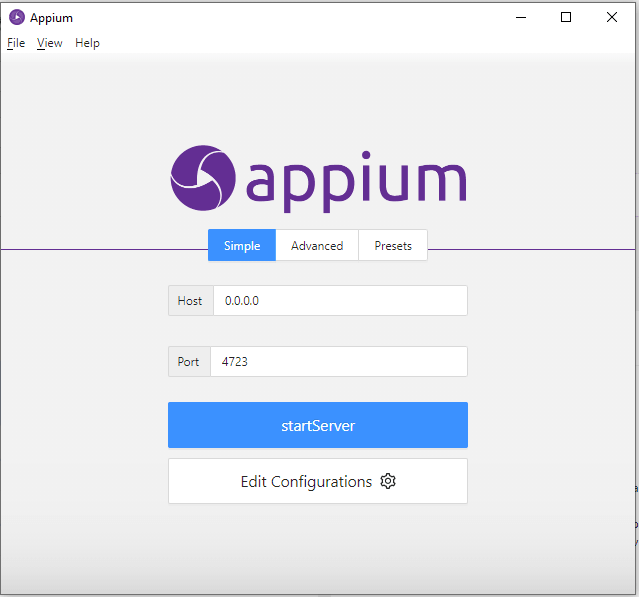
Appium Server is the core component of Appium architecture, without which you won’t be able to use any Appium client libraries. Appium Server is required to run the Appium tests. Using Appium-desktop, you can start the Appium server, which would help us run the Appium Inspector and locate the elements of the app locally.
We have three tabs on the home screen of the Appium Desktop app:
Simple
Advanced
Presets
Simple Tab:
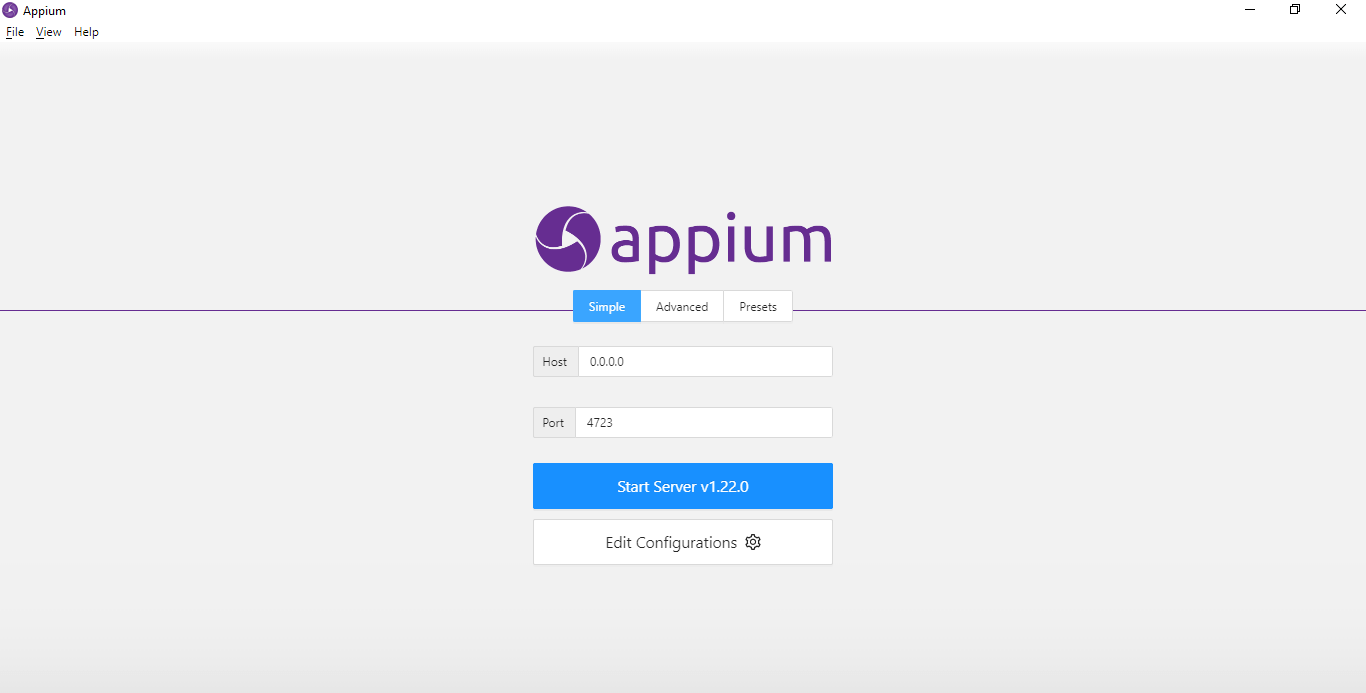
This is the first tab displayed once you start the Appium Desktop app. Only two parameters are required to start the Appium Server in most simple terms; those are Host and Port. So, if the user provides no values, the Appium Server is started by default using the following values:
Host: 0.0.0.0 Port: 4723
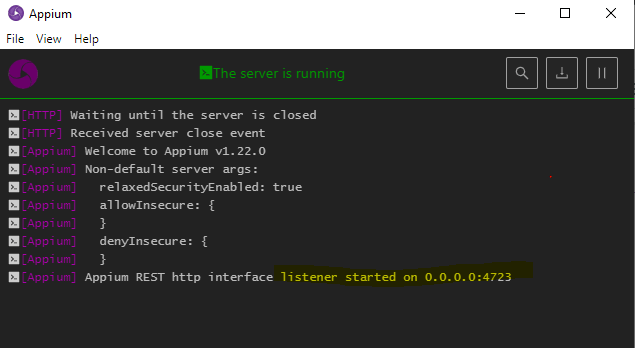
Advanced Tab:
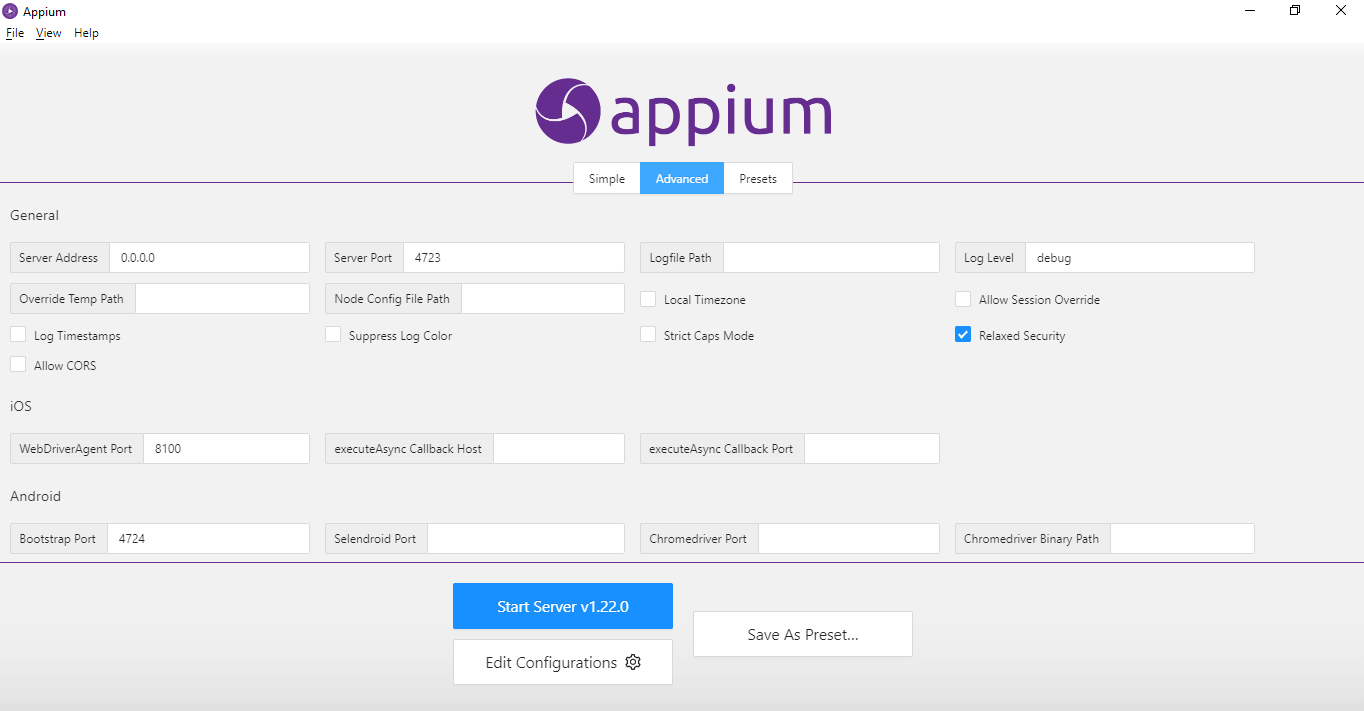
This is the second tab in the Appium Desktop app. This tab has three sections:
General — This section has all the common fields for Android and iOS.
Android — This section has fields that are specific to Android only.
iOS — This section has fields that are specific to iOS only.
Fields in all the sections are not mandatory to start the Appium Server. It is provided so a user can provide more detailed options as per his requirement and accordingly start the Appium Server. The mandatory fields are Server Address and Server Port.
Relaxed Security is ticked by default to download ChromeDriver, which helps locate the elements in WebView on an Android hybrid app. If it is unticked, it might result in an error while locating elements in WebView for the Android Hybrid app. Here, we can save the values as Presets, which could be used later.
Presets Tab:
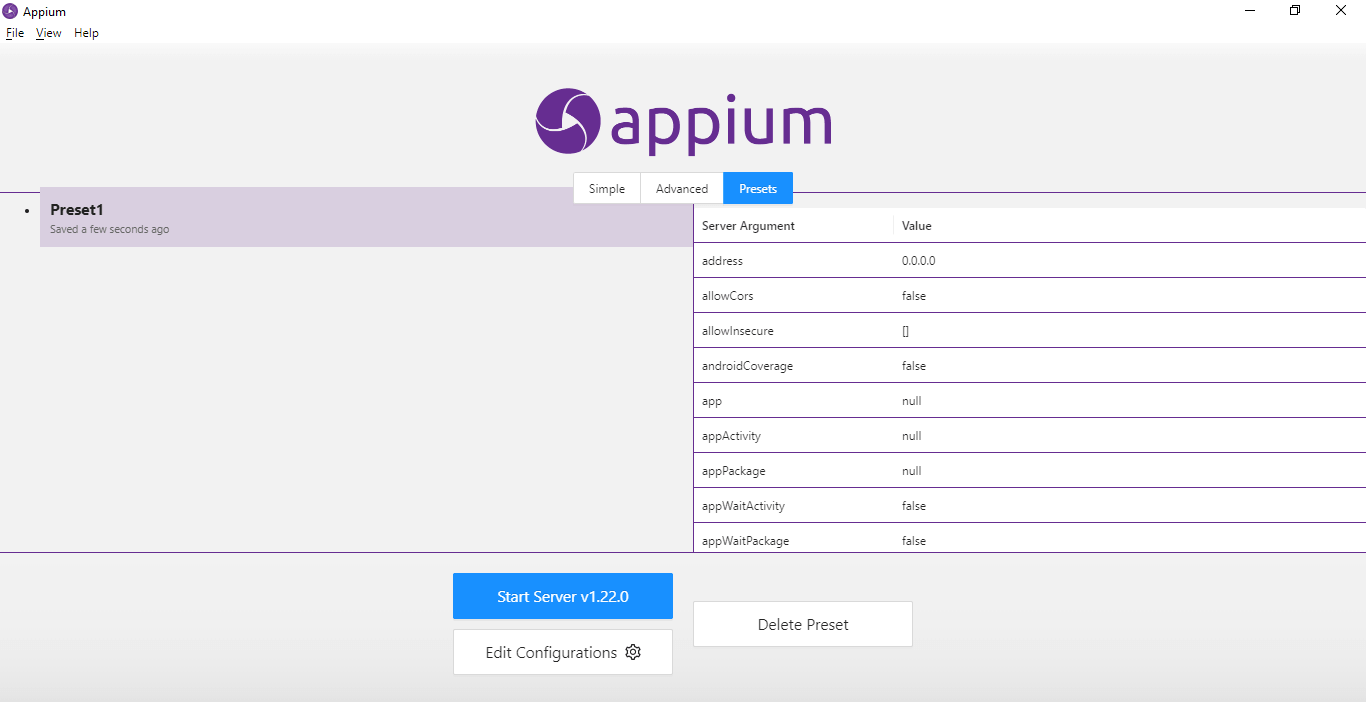
This Tab shows the Presets that have been saved earlier. Earlier saved Presets could be used to start the Appium Server easily without defining everything afresh.
*Note: Appium Server is not required to run locally if you want to locate the elements when using LambdaTest.*
We need to perform the following steps to run our Appium tests successfully on the LambdaTest platform.
Upload the app to LambdaTest using its app-upload API.
Set the “app_url” received in response from Step 1 in the Appium configuration (desired capabilities).
We should be good at running our tests on LambdaTest.
In this tutorial on agile testing, let’s deep dive into the history of Agile testing, its advantages, disadvantages, methods, quadrants, and best practices.
Writing React Native app tests for Android and iOS
Before we begin writing the tests and discuss the code, let me tell you about the tools we would be using to write and run the tests:
The following tools/language have been used in writing and running the tests:
Programming Language: Java
Web Automation Tool: Appium (Server Version 1.22.3–4, Appium Java client — 7.6.0)
Test Runner: TestNG
Build Tool: Maven
Cloud Platform to run the tests: LambdaTest
How to test React Native apps on iOS and Android using Appium?
Let’s discuss the mobile testing strategy for the Proverbial app and focus on what and how we automate it? This app opens with a Home Page with a welcome message and some buttons.
We would be using the following test scenario for automation:
Open the App and check the welcome message — “Hello! Welcome to LambdaTest Sample App called Proverbial” is displayed correctly.
Click on the Text button and check that the text message “Proverbial” is displayed.
Click on the Notification button and check that the notification is displayed on the top. Check that the notification appears correctly and click to close it.
Click on the Toast button and check that the toast message is displayed at the bottom of the screen, and verify its text “Toast should be visible”.
Click on the GeoLocation button and check that the app navigates to the geolocation page successfully. Once navigation to the geolocation page is successful, navigate back to the home page.
Click on the SpeedTest button and check that the app navigates to the SpeedTest page, and verify the banner is displayed. After verification, navigate back to the Home Page.
Click on the Browser menu at the bottom of the screen. Once the app navigates to the browser page, enter the text “https://www.lambdatest.com” and click on the Find button to check if the website loads on the screen.
Getting Started
As discussed earlier, this project has been created using Maven. TestNG is used as a test runner. Once the project is created, we need to add the dependency for Appium and lombok in the pom.xml file.
pom.xml
<dependencies>
       <!-- [https://mvnrepository.com/artifact/org.testng/testng](https://mvnrepository.com/artifact/org.testng/testng) -->
       <dependency>
           <groupId>org.testng</groupId>
           <artifactId>testng</artifactId>
           <version>${testng-version}</version>
           <scope>test</scope>
       </dependency>
       <!-- [https://mvnrepository.com/artifact/io.Appium/java-client](https://mvnrepository.com/artifact/io.Appium/java-client) -->
       <dependency>
           <groupId>io.Appium</groupId>
           <artifactId>java-client</artifactId>
           <version>${Appium-java-client-version}</version>
       </dependency>
       <!-- [https://mvnrepository.com/artifact/org.projectlombok/lombok](https://mvnrepository.com/artifact/org.projectlombok/lombok) -->
       <dependency>
           <groupId>org.projectlombok</groupId>
           <artifactId>lombok</artifactId>
           <version>${lombok-version}</version>
           <scope>provided</scope>
       </dependency>
    </dependencies>
GitHub: https://github.com/mfaisalkhatri/react-native-app-tests
Versions of the dependencies are set in a separate properties block. This is done for maintainability, so if we need to update the versions, we can do it easily without having to search throughout the pom.xml file.
Properties Block
<properties>
       <testng-version>7.6.0</testng-version>
       <Appium-java-client-version>7.6.0</Appium-java-client-version>
       <lombok-version>1.18.24</lombok-version>
    </properties>
Automation Tests
Before we begin to discuss the configurations and setup, I must tell you that the Page Object Model is used for writing the tests, as it helps organize the tests, maintenance, and easy readability and reuse.
Page Object Model
In the Page Object Model, a class is created for every web page where all the related elements of the respective page are stored, and also the relevant action methods are created inside that class. This way, it helps in separating the page objects from the tests and helps in easy maintenance and readability of its related objects.
In this article on how to test React Native apps on iOS and Android, as per the test strategy we have defined earlier, we would be creating four different classes for all our four different pages, namely, HomePage, GeoLocationPage, SpeedTestPage, and BrowserPage where specific locators of their respective pages will be stored, and we would be calling these locators in our tests to check the application.
In this ad hoc testing tutorial, let’s deep dive into what Ad hoc testing is, its advantages, disadvantages, types, characteristics, and their best practices.
Platforms considered for running the tests
The following two platforms are considered for running the tests:
Android
iOS
Configuration (FileName — DriverManager)
@Builder
public class DriverManager {

   private static final ThreadLocal<AppiumDriver<MobileElement>> DRIVER = new ThreadLocal<> ();
   private              String   buildName;
   private              String   testName;
   private              Platform platform;
   private              String   platformVersion;
   private              String   deviceName;
   private              String   app;
   private static final String   LT_USERNAME     = System.getenv ("username");
   private static final String   LT_ACCESS_TOKEN = System.getenv ("token");
   private static final String   GRID_URL        = "@mobile-hub.LambdaTest.com/wd/hub";
   private static final String   URL             = "http://localhost:4723/wd/hub";

   @SneakyThrows
   public DriverManager createRemoteDriver () {
       DRIVER.set (new AppiumDriver<> (new URL (format ("https://{0}:{1}{2}", LT_USERNAME, LT_ACCESS_TOKEN, GRID_URL)),
           setCapabilities()));
       setupDriverTimeouts ();
       return this;
   }
   @SuppressWarnings ("unchecked")
   public <D extends AppiumDriver<MobileElement>> D getDriver () {
       if (null == DRIVER.get ()) {
           createRemoteDriver ();
       }
       return (D) DRIVER.get ();
   }

   public void quitDriver () {
       if (null != DRIVER.get ()) {
           getDriver ().quit ();
           DRIVER.remove ();
       }
   }

   private void setupDriverTimeouts () {
       getDriver ().manage ()
           .timeouts ()
           .implicitlyWait (30, TimeUnit.SECONDS);
   }

   private DesiredCapabilities setCapabilities() {
       DesiredCapabilities capabilities = new DesiredCapabilities ();
       capabilities.setCapability ("build", buildName);
       capabilities.setCapability ("name", testName);
       capabilities.setCapability (MobileCapabilityType.PLATFORM_NAME, platform);
       capabilities.setCapability (MobileCapabilityType.PLATFORM_VERSION, platformVersion);
       capabilities.setCapability (MobileCapabilityType.DEVICE_NAME, deviceName);
       capabilities.setCapability (MobileCapabilityType.APP, app);
       capabilities.setCapability ("isRealMobile", true);
       capabilities.setCapability ("network", true);
       capabilities.setCapability ("visual", true);
       capabilities.setCapability ("console", true);
       capabilities.setCapability ("devicelog", true);
       return capabilities;
   }
}
The first and most important task is to set up the drivers so we can use them to run the test. Here, AppiumDriver is used to run the tests as we would be running the tests on the LambdaTest platform. AndroidDriver and IOSDriver both extend AppiumDriver.
The following are prerequisites to run the tests on the LambdaTest platform:
| FIELD NAME | DESCRIPTION |
| LambdaTest Username | This value can be found in the LambdaTest Profile Section of the website after registration. |
| LambdaTest Access Token | This value can be found in the LambdaTest Profile Section of the website after registration. |
| GRID URL | “This URL is compulsorily required to run the tests on the LambdaTest platform. Value is: “@mobile-hub.LambdaTest.com/wd/hub”” |
| Other important capabilities | These are capabilities like Platform, Device, OS version, etc., required to run the tests. |
Username, Access Token, and Grid URL are defined as constant(static final) values as these are not going to change anytime throughout the tests.
With respect to Desired Capabilities, these are dynamic values set in the setCapabilities() method as these values would be changing according to the requirement to perform Android automation testing and iOS automation testing.
Capabilities Specific to LambdaTest
| CAPABILITY NAME | DESCRIPTION | VALUE TO BE SET |
| build | Used for setting the build name | Any String value can be set here |
| test | Used for setting the test name | Any String value can be set here |
| isRealMobile | Should be set to true if you need to run the tests on a real device, otherwise false. | “true” / ”false” |
| network | Should be set to true if you need to enable network logs. | “true” / ”false” |
| visual | Should be set to true if you need step by step screenshots of the test. | “true” / ”false” |
| console | Capture the browser logs at various steps in the test. | “true” / ”false” / “error”/ “warn” / “info” |
| devicelog | Capture the device logs | “true” / ”false” |
Capabilities specific to Appium (Mandatory for running the tests)
| CAPABILITY NAME | DESCRIPTION | VALUE TO BE SET |
| Platform Name | For setting the platform name | “For mobile automation: IOS, Android” |
| Platform Version | For setting the Platform Version. | OS version |
| Device Name | Set the device name on which tests should be run. | Device Name like “Galaxy S9 Plus” / “iPhone 11” |
| App | App URL is required if we need to run the tests on a Cloud platform. | “app_id” / “app_url” received in response once the app is uploaded using the respective cloud API. |
| App Path should be provided to run the tests on local | “Local path” if the tests are run in your local machine. |
ThreadLocal class is used here for setting the drivers as it is threaded safe and works very well when tests are run in parallel. The main reason behind using ThreadLocal is that two threads cannot see each other’s ThreadLocal variables even if two threads set different values on the same ThreadLocal object.
So, once your desired capabilities are set, we need to set the driver and pass the LambdaTest Username, Access Token, and Grid URL along with the desired capabilities so it can be used to generate the connection with the cloud platform to run the tests.
One important point to note here is Lombok’s @Builder annotation is used in this class which will allow us to build and take the respective desired capabilities details on run time without having to pass the respective parameters in the method signature.
Base Test
Let’s define the Base Test now, which can be extended and used in other tests, so we don’t repeat ourselves in setting the same configuration repeatedly. Single Base Test is created to help us set the base for Android and iOS tests.
public class BaseTest {

       protected DriverManager driverManager;

       [@Parameters](http://twitter.com/Parameters) ({ "buildName", "testName","app","platformName","version","device" })
       [@BeforeClass](http://twitter.com/BeforeClass)
       public void setupTest (String buildName, String testName, String app, Platform platform, String platformVersion, String deviceName) {
           driverManager = DriverManager.builder ()
               .buildName (buildName)
               .testName (testName)
               .app (app)
               .platform (platform)
               .platformVersion (platformVersion)
               .deviceName (deviceName)
               .build ()
               .createRemoteDriver ();
       }

       [@AfterClass](http://twitter.com/AfterClass)
       public void tearDown () {
           driverManager.quitDriver ();
       }
    }
As you can see, “buildName”, “testName” , “app”, “platformName”, “version” and “device” are all captured as a part of TestNG annotation @Parameters which will be set using testng.xml file.
Next, the builder design pattern is used to build the instance for driverManager and accordingly pass the respective values so we can run tests on the desired configurations.
Let’s deep dive into the test automation strategy we defined earlier and start writing the tests.
Packages — Pages and Tests
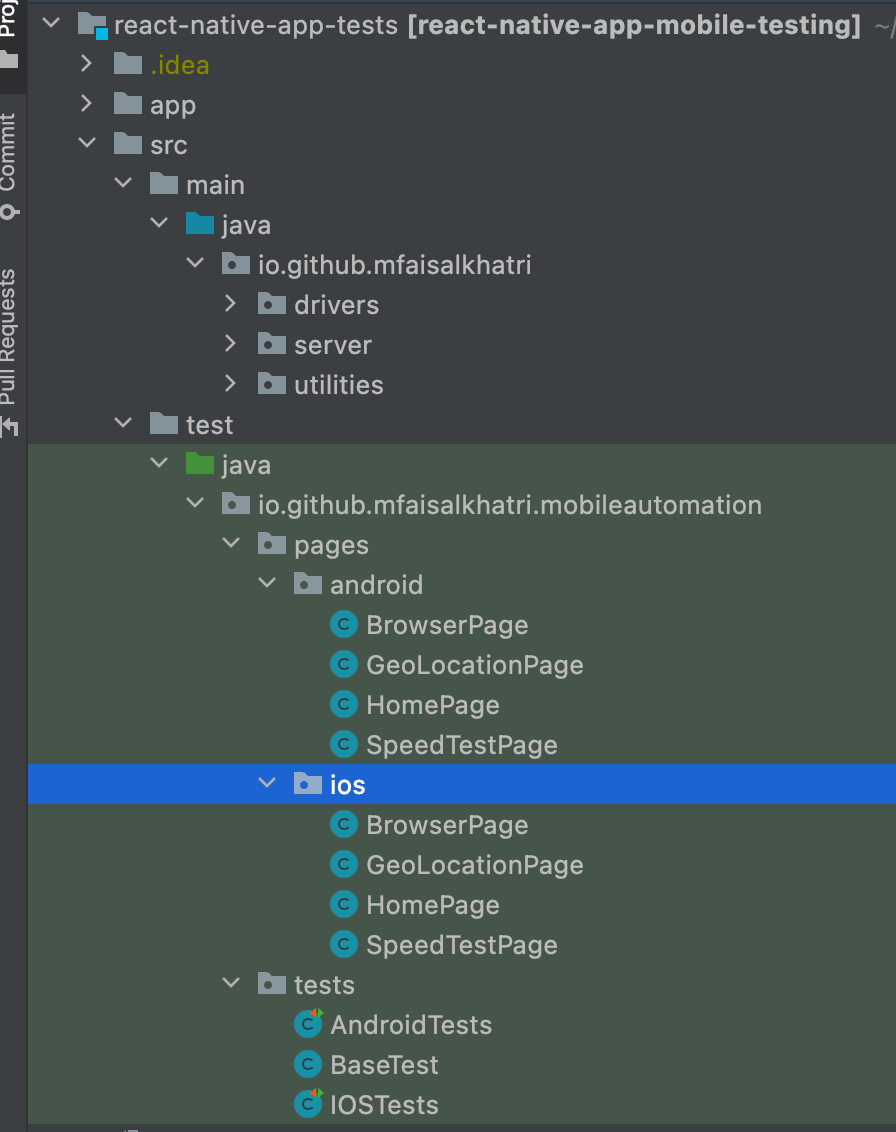
Two separate packages have been created, first for Android pages and second for iOS pages, as locators are different for both the respective packages. Similarly, another package for tests has been created for test classes.
Page Classes
First, let’s locate the element for the required elements for Android and iOS, which would help us to run the tests.
HomePage class for Android
public class HomePage {

   DriverManager driverManager;
   WebDriverWait wait;

   public HomePage (final DriverManager driverManager) {
       this.driverManager = driverManager;
       wait = new WebDriverWait (driverManager.getDriver (), 20);
   }

   public MobileElement textBtn () {
       return driverManager.getDriver ()
           .findElement (MobileBy.id ("Text"));
   }

   public String getText () {
       return driverManager.getDriver ()
           .findElement (MobileBy.id ("Textbox"))
           .getText ();
   }

   public MobileElement notificationBtn() {
       return driverManager.getDriver ().findElement (MobileBy.id ("notification"));
   }

   public MobileElement notificationBar() {
       return driverManager.getDriver ().findElement (MobileBy.id ("action_bar"));
   }

   public MobileElement toastBtn() {
       return driverManager.getDriver ().findElement (MobileBy.id ("toast"));
   }

   public String toastMessage () {
       return wait.until (ExpectedConditions.presenceOfElementLocated (MobileBy.xpath ("//Android.widget.Toast[1]"))).getText ();
   }

   public MobileElement geoLocationBtn() {
       return driverManager.getDriver ().findElement (MobileBy.id ("geoLocation"));
   }

   public MobileElement speedtTestBtn () {
       return driverManager.getDriver ().findElement (MobileBy.id ("speedTest"));
   }


   public MobileElement browserMenu () {
       return driverManager.getDriver ().findElement (MobileBy.AccessibilityId ("Browser"));
   }

}
HomePage class for iOS
public class HomePage {

   DriverManager driverManager;
   WebDriverWait wait;

   public HomePage (final DriverManager driverManager) {
       this.driverManager = driverManager;
       wait = new WebDriverWait (driverManager.getDriver (), 20);
   }

   public MobileElement textBtn () {
       return driverManager.getDriver ()
           .findElement (MobileBy.AccessibilityId ("Text"));
   }

   public String getText () {
       return driverManager.getDriver ()
           .findElement (MobileBy.AccessibilityId ("Textbox"))
           .getText ();
   }

   public MobileElement notificationBtn() {
       return driverManager.getDriver ().findElement (MobileBy.AccessibilityId ("notification"));
   }

   public MobileElement notificationBar() {
          return (MobileElement)wait.until (ExpectedConditions.presenceOfElementLocated (MobileBy.AccessibilityId ("NotificationShortLookView")));
   }

   public MobileElement toastBtn() {
       return driverManager.getDriver ().findElement (MobileBy.AccessibilityId ("toast"));
   }

   public String toastMessage () {
       return wait.until (ExpectedConditions.presenceOfElementLocated (MobileBy.xpath ("//*[contains(@label, 'Toast should be visible')]"))).getText ();
   }

   public MobileElement geoLocationBtn() {
       return driverManager.getDriver ().findElement (MobileBy.AccessibilityId ("geoLocation"));
   }

   public MobileElement speedtTestBtn () {
       return driverManager.getDriver ().findElement (MobileBy.AccessibilityId ("speedTest"));
   }

   public MobileElement browserMenu () {
       return driverManager.getDriver ().findElement (MobileBy.AccessibilityId ("Browser"));
   }

}
From the code, it is pretty clear that elements for the HomePage on Android were located using the locator strategy “id” in most of the cases, and for browserMenu “AccessibilityId” was used. For iOS, Accessibility Id was used to locate mostly all the elements.
GeolocationPage class for Android
public class GeoLocationPage {

   private DriverManager driverManager;
   private WebDriverWait wait;

   public GeoLocationPage (final DriverManager driverManager) {
       this.driverManager = driverManager;
       wait = new WebDriverWait (driverManager.getDriver (), 30);
   }

   public MobileElement content () {
       return (MobileElement) wait.until (
           ExpectedConditions.presenceOfElementLocated (MobileBy.id ("Android:id/content")));
   }

   public void navigateToHomePage () {
       driverManager.getDriver ()
           .navigate ()
           .back ();
   }

}
GeolocationPage class for iOS
public class GeoLocationPage {

   DriverManager driverManager;
   WebDriverWait wait;

   public GeoLocationPage (final DriverManager driverManager) {
       this.driverManager = driverManager;
       wait = new WebDriverWait (driverManager.getDriver (), 30);
   }

   public MobileElement banner () {
       return (MobileElement) wait.until (
           ExpectedConditions.presenceOfElementLocated (MobileBy.AccessibilityId ("banner")));
   }

   public MobileElement backBtn () {
       return driverManager.getDriver ()
           .findElement (MobileBy.AccessibilityId ("Back"));
   }

   public void navigateToHomePage () {
       clickOn (backBtn ());
   }

}
Similarly, as we did in HomePage, a locator for checking the content was found using the locator strategy id for Android. For iOS, Accessibility Id was used.
One thing to note here is the navigateToHomePage() method, which was created to take the user back to the home page once the user has done the required actions needed to perform the tests in Android. For iOS, a back button is available in the app. Hence it was located using Accessibility Id, and accordingly click was performed to navigate to the Home page.
SpeedTestPage class for Android
public class SpeedTestPage {

       private DriverManager driverManager;

       public SpeedTestPage (final DriverManager driverManager) {
           this.driverManager = driverManager;
       }

       public MobileElement headerText () {
           return driverManager.getDriver ()
               .findElement (MobileBy.AccessibilityId ("Speedtest"));
       }

       public void navigateToHomePage () {
           driverManager.getDriver ()
               .navigate ()
               .back ();
       }

    }
SpeedTest Page class for iOS
public class SpeedTestPage {

       DriverManager driverManager;

       public SpeedTestPage (final DriverManager driverManager) {
           this.driverManager = driverManager;
       }

       public String headerText () {
           return driverManager.getDriver ()
               .findElement (MobileBy.iOSClassChain ("**/XCUIElementTypeImage[`label == \"Speedtest\"`]"))
               .getText ();
       }

       public void navigateToHomePage () {
           driverManager.getDriver ()
               .navigate ()
               .back ();
       }
    }
The code is self-explanatory for the SpeedTest page for Android. For locating elements on iOS, the iOSClassChain locator strategy was used to locate the speedTest label.
Setting up the Tests
Page Object classes with their respective locators are set. Now, let’s move ahead and use those page classes to write tests and verify the different scenarios that we discussed earlier as a part of our test strategy.
Android Tests
public class AndroidTests extends BaseTest{

       private HomePage homePage;
       private BrowserPage browserPage;
       private GeoLocationPage geoLocationPage;
       private SpeedTestPage speedTestPage;

       [@BeforeClass](http://twitter.com/BeforeClass)
       public void setupTest () {
           homePage = new HomePage (driverManager);
           browserPage = new BrowserPage (driverManager);
           geoLocationPage = new GeoLocationPage (driverManager);
           speedTestPage = new SpeedTestPage (driverManager);

       }
iOS Tests
public class IOSTests extends BaseTest {

       private HomePage        homePage;
       private GeoLocationPage geoLocationPage;
       private BrowserPage     browserPage;
       private SpeedTestPage   speedTestPage;

       [@BeforeClass](http://twitter.com/BeforeClass)
       public void setupTest () {
           homePage = new HomePage (driverManager);
           geoLocationPage = new GeoLocationPage (driverManager);
           browserPage = new BrowserPage (driverManager);
           speedTestPage = new SpeedTestPage (driverManager);
       }
Two separate test classes, one for Android and another for iOS, have been created, which extend the BaseTest class. setupTest() method is created inside the respective test classes to initialize the page object classes so it can be used in the test methods, and we don’t have to do the initialization multiple times.
Welcome Text and Text Button Test
Below is the working code which is used to implement the test discussed in the test strategy.
Open the App and check the welcome message — “Hello! Welcome to LambdaTest Sample App called Proverbial” is displayed correctly.
Click on the Text button and check that the text message “Proverbial” is displayed.
Android Test
[@Test](http://twitter.com/Test)
    public void textTests () {
       assertEquals (homePage.getText (), "Hello! Welcome to LambdaTest Sample App called Proverbial");
       clickOn (homePage.textBtn ());
       assertEquals (homePage.getText (), "Proverbial");
    }
iOS Test
[@Test](http://twitter.com/Test)
    public void textTests () {
       assertEquals (homePage.getText (), "Hello! Welcome to LambdaTest Sample App called Proverbial");
       clickOn (homePage.textBtn ());
       assertEquals (homePage.getText (), "Proverbial");
    }
Notification Test
- Click on the Notification button and check that Notification is displayed on the top. Also check that the notification appears correctly and click to close it.
Android Test
[@Test](http://twitter.com/Test)
    public void notificationTest() {
       clickOn (homePage.notificationBtn ());
       assertTrue (homePage.notificationBar ().isDisplayed ());
       clickOn (homePage.notificationBar ());
    }
iOS Test
[@Test](http://twitter.com/Test)
    public void notificationTest () {
       clickOn (homePage.notificationBtn ());
       assertTrue (homePage.notificationBar ()
           .isDisplayed ());
    }
Toast Message Test
- Click on the Toast button and check that the toast message is displayed at the bottom of the screen and verify its text “Toast should be visible”.
Android Test
[@Test](http://twitter.com/Test)
    public void toastMessageTest () {
       clickOn (homePage.toastBtn ());
       assertEquals (homePage.toastMessage (), "Toast should be visible");
    }
iOS Test
[@Test](http://twitter.com/Test)
    public void toastMessageTest () {
       clickOn (homePage.toastBtn ());
    }
Geolocation Test
- Click on the GeoLocation button and check that the app navigates to the geolocation page successfully. Once navigation to the geolocation page is successful, navigate back to the home page.
Android Test
[@Test](http://twitter.com/Test)
    public void geoLocationTest () {
       clickOn (homePage.geoLocationBtn ());
       assertTrue (geoLocationPage.content ()
           .isDisplayed ());
       geoLocationPage.navigateToHomePage ();
    }
iOS Test
[@Test](http://twitter.com/Test)
    public void geoLocationTest () {
       clickOn (homePage.geoLocationBtn ());
       assertTrue (geoLocationPage.banner ()
           .isDisplayed ());
       geoLocationPage.navigateToHomePage ();
    }
SpeedTest Page Test
- Click on the SpeedTest button and check that the app navigates to the SpeedTest page by verifying the banner displayed. After verification, navigate back to the Home Page.
Android Test
[@Test](http://twitter.com/Test)
    public void speedTestPageTest () {
       clickOn (homePage.speedtTestBtn ());
       assertTrue (speedTestPage.headerText ().isDisplayed ());
       speedTestPage.navigateToHomePage ();
    }
iOS Test
[@Test](http://twitter.com/Test)
    public void speedTestPageTest () {
       clickOn (homePage.speedtTestBtn ());
       assertEquals (speedTestPage.headerText (), "Speedtest");
       speedTestPage.navigateToHomePage ();
    }
In the Android tests, the assertTrue() method is used to check that the SpeedTest is displayed. This is because there was no locator found which returned the text that could be asserted.
Browser Page Test
- Click on the Browser menu displayed at the bottom of the screen. Once the app navigates to the browser page, enter the text “https://LambdaTest.com” and click on the “Find” button to check if the website loads on the screen.
Android Test
[@Test](http://twitter.com/Test)
    public void browserTest () {
       clickOn (homePage.browserMenu ());
       browserPage.searchFor ("[https://LambdaTest.com](https://LambdaTest.com)");
    }
iOS Test
[@Test](http://twitter.com/Test)
    public void browserTest () {
       clickOn (homePage.browserMenu ());
       browserPage.searchFor ("[https://LambdaTest.com](https://LambdaTest.com)");
    }
You can also subscribe to the LambdaTest YouTube Channel and stay updated with the latest tutorials around Selenium testing, Cypress E2E testing, CI/CD, and more.
How to test React Native apps on iOS and Android using testng.xml?
Parameters for configurations like Platform, Platform version, device name, app, build name, and testname can be set using the testng.xml.
One more thing to note here is that we are running tests parallely on Android and iOS platforms by setting the values parallel =”tests” and thread-count =”2” inside the suite tag.
<?xml version="1.0" encoding="UTF-8"?>
<!DOCTYPE suite SYSTEM "http://testng.org/testng-1.0.dtd">
<suite name="Lambda tests Mobile automation test suite" parallel="tests" thread-count="2">
   <test name="Proverbial app - Android Mobile Automation" >
       <parameter name="buildName" value="Android Build"/>
       <parameter name="testName" value="Proverbial app tests"/>
       <parameter name="app" value= “<app_url> “/>
       <parameter name="platformName" value="Android"/>
       <parameter name="version" value="10"/>
       <parameter name="device" value="Galaxy S9 Plus"/>
       <classes>
           <class name="io.github.mfaisalkhatri.mobileautomation.tests.AndroidTests">
               <methods>
                   <include name="textTests"/>
                   <include name="notificationTest"/>
                   <include name="toastMessageTest"/>
                   <include name="geoLocationTest"/>
                   <include name="speedTestPageTest"/>
                   <include name="browserTest"/>
               </methods>
           </class>
       </classes>
   </test> <!-- Test -->
   <test name="Proverbial app - iOS Mobile Automation" >
       <parameter name="buildName" value="IOS Build"/>
       <parameter name="testName" value="Proverbial app tests"/>
       <parameter name="app" value="<app_url>"/>
       <parameter name="platformName" value="IOS"/>
       <parameter name="version" value="14"/>
       <parameter name="device" value="iPhone 11"/>
       <classes>
           <class name="io.github.mfaisalkhatri.mobileautomation.tests.IOSTests">
               <methods>
                   <include name="textTests"/>
                   <include name="notificationTest"/>
                   <include name="toastMessageTest"/>
                   <include name="geoLocationTest"/>
                   <include name="speedTestPageTest"/>
                   <include name="browserTest"/>
               </methods>
           </class>
       </classes>
   </test> <!-- Test -->
</suite> <!-- Suite -->
Note: LambdaTest username and access token in this code are taken from environment variables. So if you want to run these tests from your local machine do not forget to set the Environment variables: username and access token.
Trigger the following command on the terminal to run the tests using Maven:
mvn clean install -Dusername=<LambdaTest username> -Dtoken=<LambdaTesttoken>
In case Maven is not installed, the following steps should be followed to install Maven on Windows machine:
Download the Maven Zip File from the maven download page and extract it.
Add MAVEN_HOME System Variable. 2.1. Open the Start menu and search for environment variables. Click on the Edit System environment variables result. 2.2. Under the Advanced tab in the System Properties window, click Environment Variables.
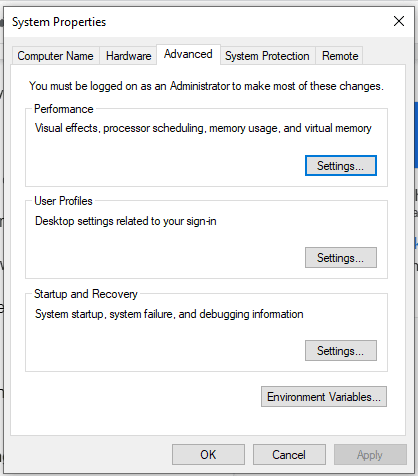
2.3. Click the New button under the System variables section to add a new system environment variable. 2.4. Enter MAVEN_HOME as the variable name and the path to the Maven directory as the variable value. Click OK to save the new system variable.

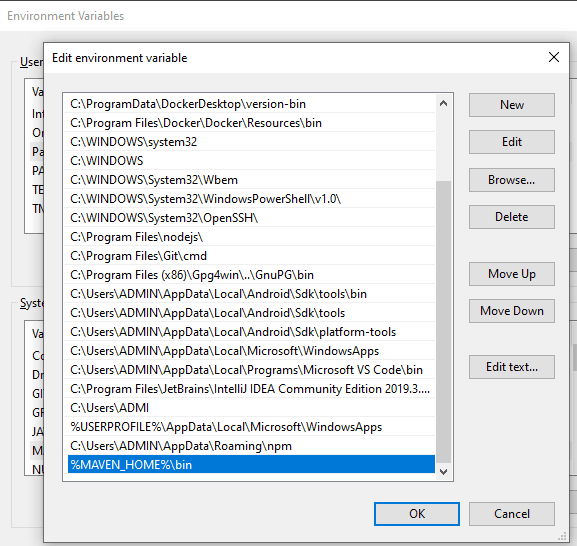
- Add MAVEN_HOME directory in the PATH Variable. 3.1. Select the Path variable under the System variables section in the Environment Variables window. Click the Edit button to edit the variable. 3.2. Click the New button in the Edit environment variable window.
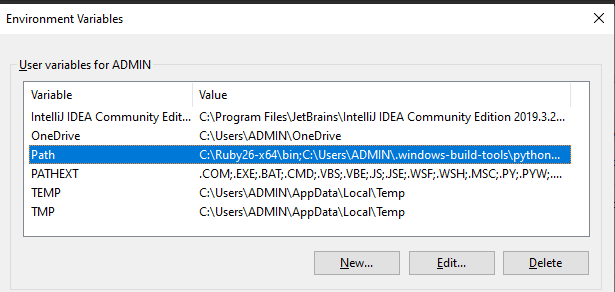
3.3. Enter %MAVEN_HOME%\bin in the new field. Click OK to save changes to the Path variable. 3.4. Click OK in the Environment Variables window to save the changes to the system variables.
- Verify if Maven is installed correctly. 4.1. Open Command Prompt and run the command: mvn -v 4.2. It should display the Maven version as shown in the screenshot below:

Now, you should be able to run your tests successfully using the mvn command.
Installing Maven on Mac machine
Installation of Maven on a Mac machine can be easily done using the Homebrew software. After installing Homebrew, just run the command “brew install maven,” and it will install Maven within seconds on your machine, and you could straight away start using maven.
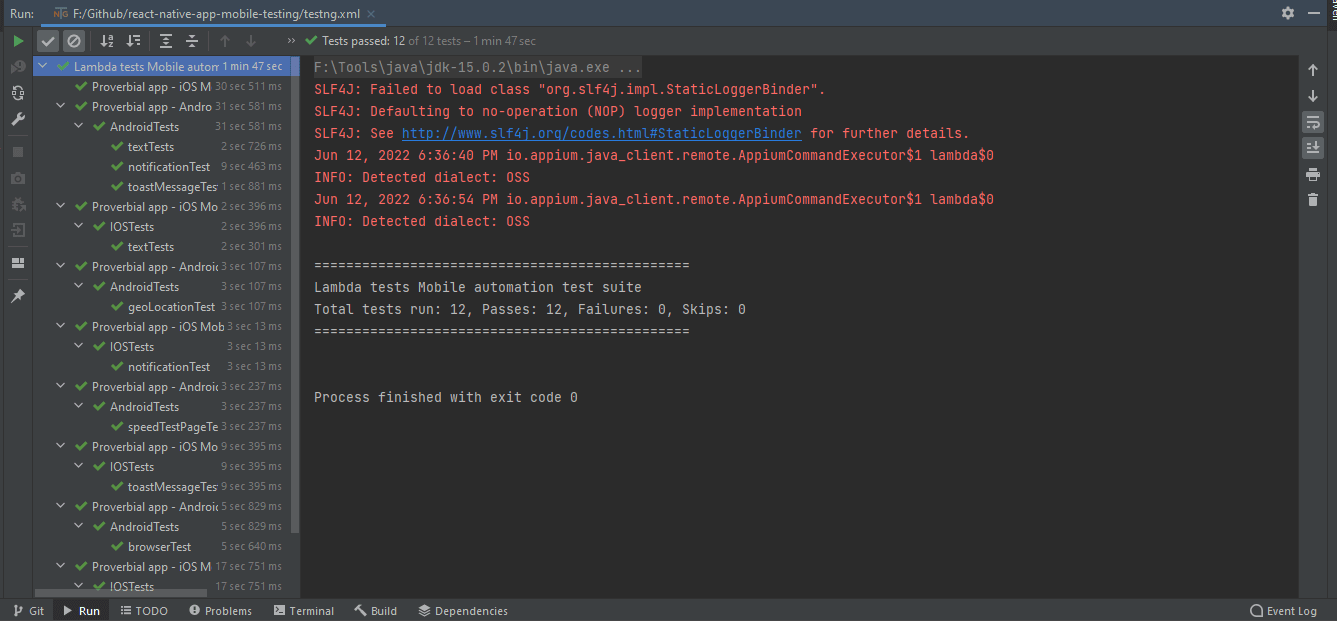
Following is the screenshot from IntelliJ, which shows the execution status of the tests:
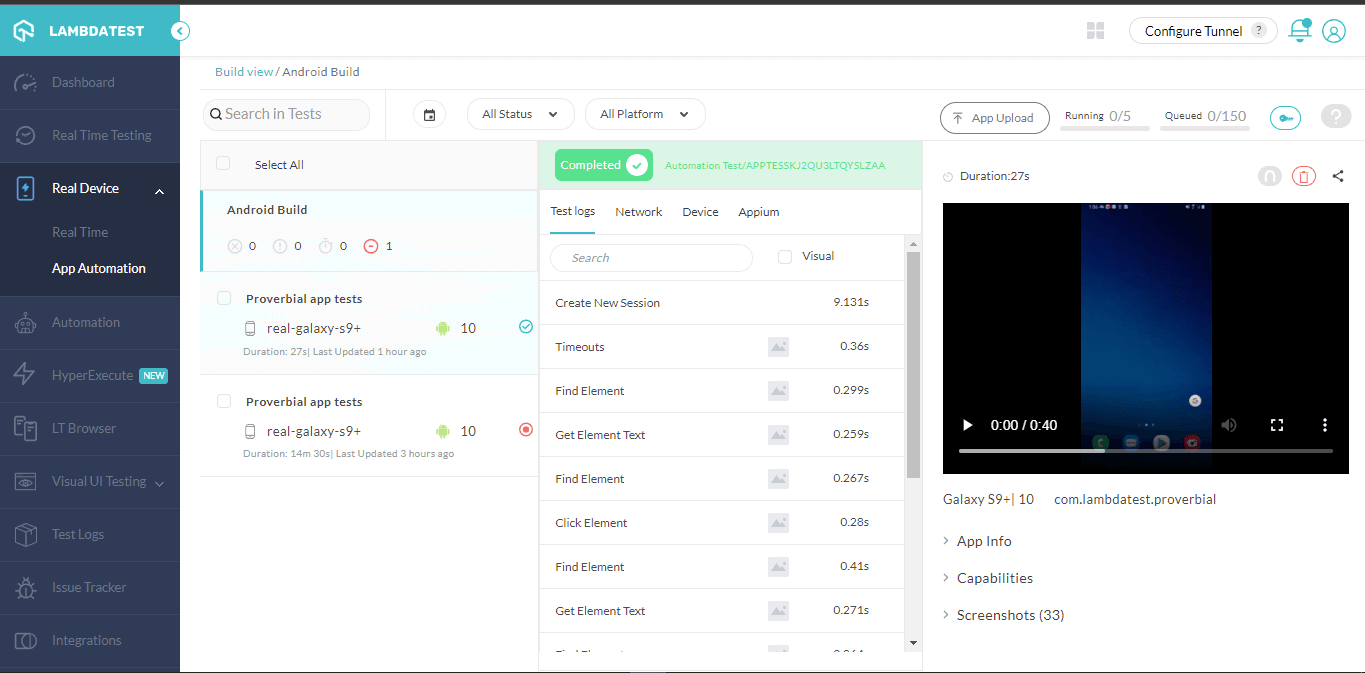
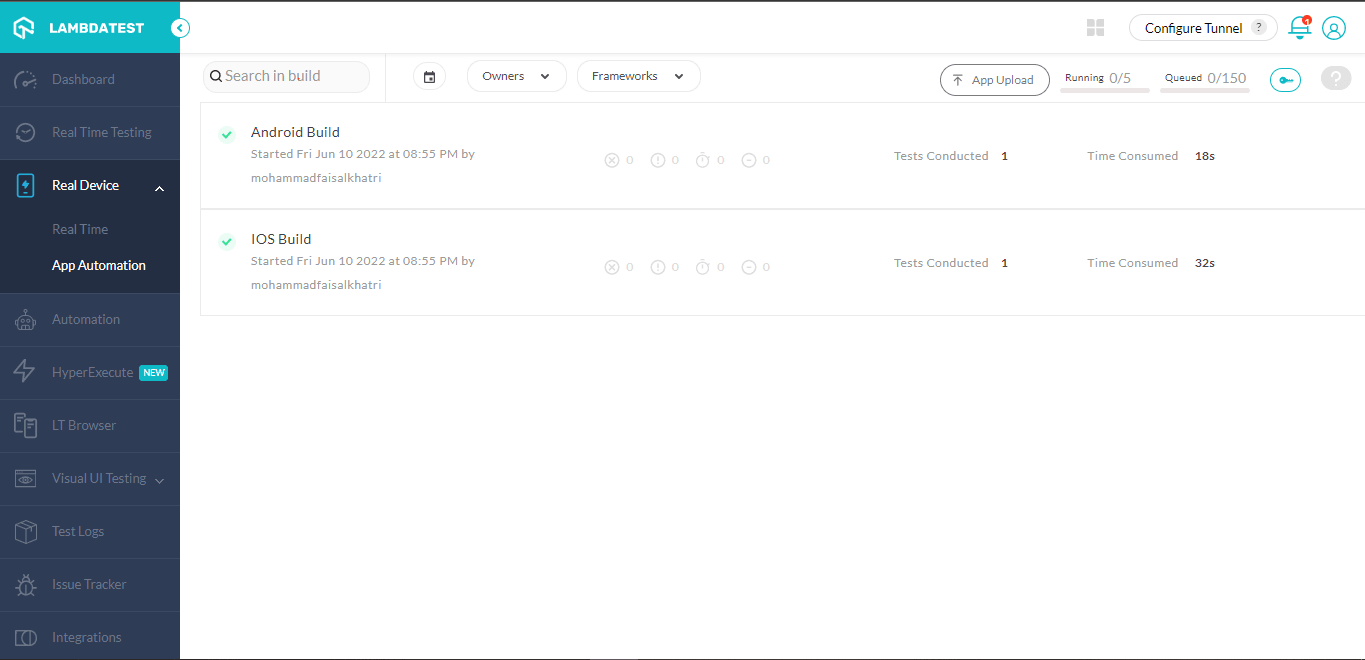
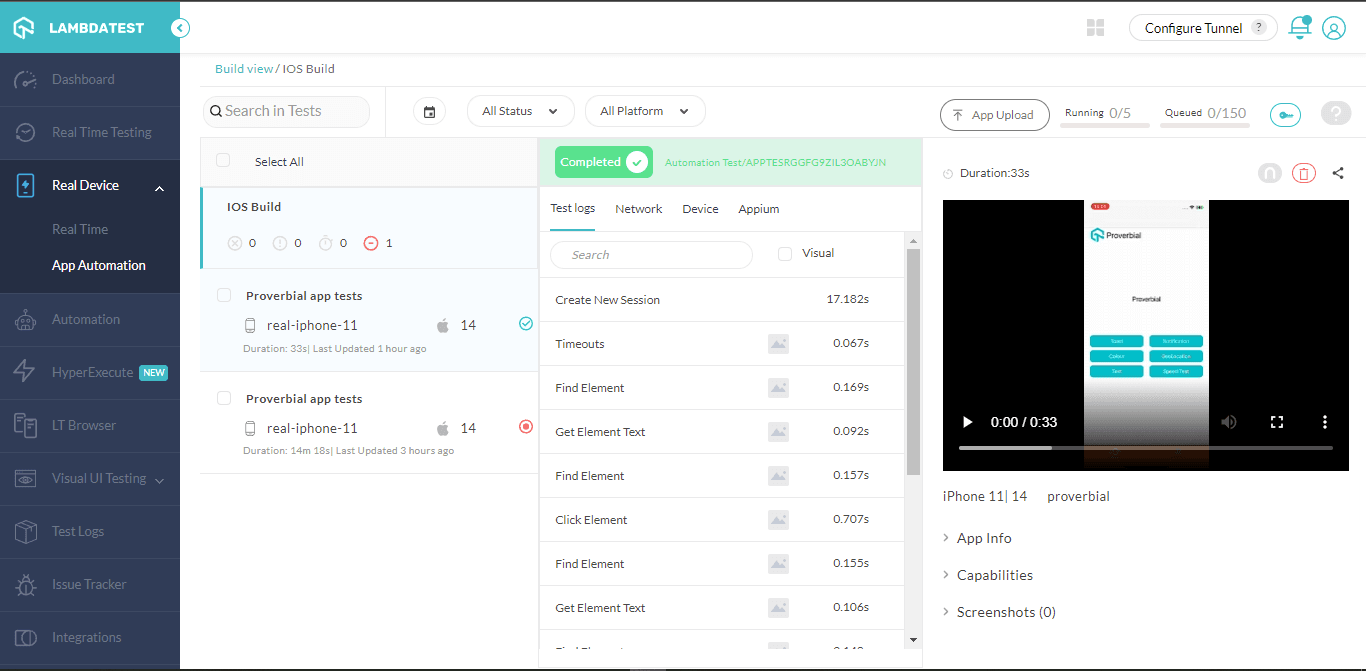
Once the tests are run successfully, we can check out the LambdaTest Dashboard and view all the video recordings, screenshots, device logs, and step by step granular details of the test run. Check out the Screenshots below, which will give you a fair idea of how the dashboard for automated app tests looks like.
Conclusion
In this React testing tutorial, we discussed how to test React Native apps on iOS and Android. We discussed the test strategy and then went ahead with locating the elements using Appium Inspector. Finally, we were able to write the code using Java with Appium for React Native apps to test on Android devices and test on iOS devices.
Finally, we ran the tests on the LambdaTest platform, which ran the tests really fast and also gave us good insights with video recording, screenshots, and different logs about the tests.
Happy Testing!
